Module Pattern in Javascript

“JavaScript is a lightweight, interpreted, object-oriented programming language with first-class functions most commonly known as a scripting language for web pages.”

Introduction
Every Javascript programmer strive to write clean and reusable code as it allows them to clearly communicate with the next developer who works with what they have written. In the software development world, writing clean code helps everyone to fix the problem easily when they arise. To be a better developer, teammate or employee, one should write more declarative code which will be easier to read, easier to understand and easier to change and which can communicate better for future use by the same or other developer.

Here it comes the concept of “Design Pattern”. A Design Pattern helps to write beautiful, clean, structured and maintainable code by applying latest best practices to the language. We can use the patterns as templates through which we can solve problems in different situations.

“Each pattern describes a problem which occurs over and over again … and then describes the core of the solution to that problem, in such a way that you can use this solution a million times over, without doing it the same way twice.”

Christopher Alexander

Module Pattern
This is one of the core and important pattern in Javascript. This is widely used to couple a set of variables and functions together in a single scope independent of other components. A module is nothing but a file or class which contains different behavioral code compared to a normal script. While wrapping the public and private variables/methods inside a single object, it reduces the chance of conflicting of function names with other functions from other scripts. Let us quickly check one simple example –

A Simple Example

var exampleModule = function() {
  var counter = 0;
  
  function changeBy(val) {
    counter += val;
  }
  
  function increment() {
    changeBy(1);
  }
  
  function decrement() {
    changeBy(-1);
  }
  
  function getValue() {
    return counter;
  }
  
  return {
    add: increment,
    subtract: decrement,
    value: getValue
  }
}

const module = exampleModule();
console.log(module.value());      // Returns 0
module.add();
module.add();
module.add();
console.log(module.value());      // Returns 3
module.subtract();
console.log(module.value());      // Returns 2

So, what we did above, any guess? :smiley: We did nothing but executed one simple example class utilizing an immediately invoked function expression. It means Modules should be Immediately-Invoked-Function-Expressions (IIFE) to allow for private scopes. This is how a module pattern template looks like –

Module Pattern Template

(function() {
    // declare private variables and/or functions

    return {
        // declare public variables and/or functions
    }
})();

Revealing Module Pattern
A different variation of Module Pattern is called the Revealing Module Pattern. It differentiate from Module Pattern in terms of how the revealing module pattern exposes it’s API.

Revealing Module Pattern Template

var revealingmodule = function () {
    // private variables (made public by an alias)
    // private functions (made public by an alias)

    return {
        // alias to functions and vars
        // you want to make public
    };
}();

A Simple Example

var exampleModule = function(counter) {
    function changeBy(val) {
        counter += val;
    }

    function increment() {
        changeBy(1);
    }

    function decrement() {
        changeBy(-1);
    }

    function getValue() {
        return counter;
    }

    return {
        increment: increment,
        decrement: decrement,
        getValue: getValue
    }
}(5);

console.log(exampleModule.getValue());     // Returns 5
exampleModule.increment();
console.log(exampleModule.getValue());     // Returns 8
exampleModule.decrement();
console.log(exampleModule.getValue());     // Returns 7

The above example looks quite similar to the module pattern with a very tiny difference of not using “new“ keyword and adding a simple parenthesis just after the function declaration. This method of writing the code knows as self-calling function. One more difference is in the return statement for which we no need to use aliases as we were doing for module pattern.

Pros of Module Pattern
1. We can have the flexibility to modularize scripts in reusable objects
2. Implement encapsulation with which we can use private methods and expose public methods as and when required
3. We can remove variables and functions from the global scope and can wrap those into classes

Cons of Module Pattern
1. It is very hard to extend and override the class variables and functions
2. The scoped functions get duplicated across many objects in memory as in how many times the object get used
3. The pattern adds little complexity on code debugging

Conclusion
In this article, we have checked how the Module Pattern can be used to provide code encapsulation which leads to write clean and reusable code which will be easier to maintain throughout the application. The logical independent block of code are relatively easier to update and maintain and using which we do not need to define the same functions at multiple places. This pattern really works great for when you want to simply build a means of allowing others to create objects they will use without the need for extension or modification. So, that’s it! :slight_smile: I hope this article helps you. Please add comments or feedback if you have any. Thank you!

Javascript : Block Scoped Variables & Functions

This article highlights new feature introduced in ECMAScript 6 called “Block Scoped Variable” & “Block Scoped Functions“. In internet, you may find many articles on block scoped variable and functions. But this is an attempt to present the topic in as much simplest and easiest way as I can so that developers of each level can understand the concept clearly.

Hope everyone reading this article knows about the concept of Block Scope. In general, SCOPE refers to the range to which the particular object is relevant and BLOCK SCOPE refers to the range inside the block. So lets dive into this concept quickly without wasting much time.

Block Scoped Variables

As per ECMAScript 6 standard, a new keyword introduced named as LET. Its somehow similar to the keyword VAR, though it has some differences.

Both VAR & LET keyword are same in context of declaring variable but different regarding to its scope. LET is scoped to the nearest enclosing block whereas VAR is scoped to the nearest function block. If both the keyword present outside the block, then it behaves similarly as global.

Example 1 (with VAR keyword) :-

<script>
    for (var i = 0; i < 10; i++) {
        // do something
    }

    document.write(i);
</script>

// Output : 10

Example 1 (with LET keyword) :-

<script>
    for (let i = 0; i < 10; i++) {
        // do something
    }

    document.write(i);
</script>

// Output : ReferenceError: i is not defined

For the above example, with LET keyword, the variable i is locally blocked to the for loop, but in case of VAR keyword, the variable i is global.

Example 2 (with VAR keyword) :-

<html>
    <head>
        <title>Testing Block Scoped Variables</title>
        <style>
            div {
                width: 100px;
                height: 100px;
                background-color: #ccc;
                border: 1px solid #000;
                display: inline-block;
                font-size: 30px;
                text-align: center;
                cursor: pointer;
            }
        </style>
        <script src="https://ajax.googleapis.com/ajax/libs/jquery/1.12.4/jquery.min.js"></script>
        <script>
            $(document).ready(function() {
                for(var i = 1; i < 4; i++) {
                    $("#dv_blockScope" + i).on('click', function () {
                        alert(i);
                    });
                }
            });
        </script>
    </head>

    <body>
        <div id="dv_blockScope1">1</div>
        <div id="dv_blockScope2">2</div>
        <div id="dv_blockScope3">3</div>
    </body>
</html>

// This will output 4 on each click as it refers to the same object.

In order to fix the above issue, we need to wrap the click event in an anonymous function and pass i as argument. But without creating function, we can fix the above issue by just using LET instead of VAR as shown in code below.

Example 2 (with LET keyword) :-

<html>
    <head>
        <title>Testing Block Scoped Variables</title>
        <style>
            div {
                width: 100px;
                height: 100px;
                background-color: #ccc;
                border: 1px solid #000;
                display: inline-block;
                font-size: 30px;
                text-align: center;
                cursor: pointer;
            }
        </style>
        <script src="https://ajax.googleapis.com/ajax/libs/jquery/1.12.4/jquery.min.js"></script>
        <script>
            $(document).ready(function() {
                for(let i = 1; i < 4; i++) {
                    $("#dv_blockScope" + i).on('click', function () {
                        alert(i);
                    });
                }
            });
        </script>
    </head>
    <body>
        <div id="dv_blockScope1">1</div>
        <div id="dv_blockScope2">2</div>
        <div id="dv_blockScope3">3</div>
    </body>
</html>

// This will output the respective number i.e. 1, 2 & 3.

Block Scoped Functions

According to ECMAScript 6, the syntax for block scoped functions got changed. The function scope can be written in a different and easy manner. Lets go through one example to differentiate.

Example 3 (syntax with ES5) :-

<script>
    (function() {
        // first function
        var operation = function (a, b) {
            return a + b + '<br>';
        }

        document.write(operation(1, 2));  // O/P - 3 (executes 1st function)

        (function () {
            // second function
            var operation = function(a, b) {
                return a * b + '<br>';
            }
    
            document.write(operation(2, 3));  // O/P - 6 (executes 2nd function)
        })();

        document.write(operation(2, 3));  // O/P - 5 (executes 1st function, as it belongs to the main block)
    })();
</script>

The above example contains same method but in different function block. There are some specific notations I used in the above example which let me note it down.
1. While declaring a self executable function, we had to use (function() { .. })();.
2. We had to use var = function (param1, param2, …) { … }; notation to define a function.

But with ECMAScript 6, lets see how the scoped definition for function changed.

Example 3 (syntax with ES6) :-

<script>
    {
        // first function
        function operation(a, b) {
            return a + b + '<br>';
        }

        document.write(operation(1, 2));  // O/P - 3 (executes 1st function)

        {
            // second function
            function operation(a, b) {
                return a * b + '<br>';
            }

            document.write(operation(2, 3));  // O/P - 6 (executes 2nd function)
        }

        document.write(operation(2, 3));  // O/P - 5 (executes 1st function, as it belongs to the main block)
    };
</script>

Check the syntax with ES6.
1. We no need to write a complicated line like this (function() { .. })();. We only have to write { .. };, plain & simple.
2. We no need to use var = function (param1, param2, …) { … };, instead we can directly write function (param1, param2, …) { … }.

Example 4 (syntax with ES5) :-

<script>
    (function foo() {
        let x = 1;

        (function foo() {

            let x = 2;
            document.write(x + '<br>');  // O/P - 2

        })();

        document.write(x + '<br>');  // O/P - 1
    })();
</script>

Example 4 (syntax with ES6) :-

<script>
    {
        let x = 1;

        {
            let x = 2;
            document.write(x + ' <br>'); // 2
        }

        document.write(x + ' <br>'); // 1
    }
</script>

That’s it !!! Hope I am clear on Block Scoped Variables & Block Scoped Functions. Do you find it useful? If yes, then please like and add comments :). Thank you and I will be happy to hear from you 🙂 🙂 .

Note :- Check here for Browser support details.

Dive into Javascript forEach()

Hello everyone, this time lets go through one of the popular control flow statement in programming language named as “foreach”. “foreach”, as the name suggests, it is a control flow statement for traversing items in one or set of collection(s). This article will cover how it works with Javascript.

I hope everybody reading this article knows about what control flow statement is. Still lets go through a short glimpse about it.

“The statements inside your source files are generally executed from top to bottom, in the order that they appear. Control flow statements, however, break up the flow of execution by employing decision making, looping and branching, enabling your program to conditionally execute particular blocks of code.”

It suggests flow of the control, the order in which the statements will execute in any application. Some examples are switch-case, if, if-else (decision-making statements), for, while, do-while (looping statements), return, break, continue, label (branching statements), in general.

We will go through one new control flow statement called foreach, which is supported by these languages, as per the wiki.

General Syntax :-

for each item in collection:
  do something to item

forEach in Javascript, iterates upon Array or object(Map or Set) with the following syntax.

  • Array.prototype.forEach() :- arrElem.forEach(callback[, args]);
  • Map.prototype.forEach() :- arrElem.forEach(callback[, args]);
  • Set.prototype.forEach() :- arrElem.forEach(callback[, args]);

1. Array.prototype.forEach() :-
The method executes the specified callback function once for every array element. Lets check some examples and get clarified.

Example 1 :-

var arr = [1, 2, 3, 4, 5];
arr.forEach(function(val) {
    document.write(val + ' - ');
});

O/P :- 1 – 2 – 3 – 4 – 5

Example 2 :-

function getSquare(elem) {
    document.write((elem * elem) + ' - ');
}

var arr = [1, 2, 3, 4, 5];
arr.forEach(getSquare);

O/P :- 1 – 4 – 9 – 16 – 25

Example 3 :-

// Object which contains the callback function for forEach.
var testObj = {
    getSquare: function(elem) {
        document.write((elem * elem) + ' - ');
    }
};

var arr = [1, 2, 3, 4, 5];

// First argument is to call the getSquare function.
// Second argument 'testObj' is 'this value' present inside callback function.
arr.forEach(testObj.getSquare, testObj);

O/P :- 1 – 4 – 9 – 16 – 25

2. Map.prototype.forEach() :-
The method executes the specified callback function once per each key/value pair in the Map object. Lets go through the examples.

The syntax for callback function should be like below :-

Syntax :-

function callbackfn(value, key, obj)

// As per ECMAScript
function callbackfn(value: V, index: K, map: Map)

Example 1 :-

function assignVehicle(val, key, mapObj) {
    document.write('&lt;b&gt;' + key + '&lt;/b&gt; has bought a new &lt;b&gt;'+ val + '&lt;/b&gt;&lt;br&gt;');
}

var map = new Map();
map.set('prava', 'Fiat');
map.set('Bob', 'Harley');
map.set('Maria', 'Audi');

map.forEach(assignVehicle);

O/P :-
prava has bought a new Fiat
Bob has bought a new Harley
Maria has bought a new Audi

3. Set.prototype.forEach() :-
The method executes the specified callback function in the Set object once per each value. Lets check some example.

Example 1 :-

function checkValue(val) {
    document.write(val + ' - ');
}

var setObj = new Set();
setObj.add(1);
setObj.add(2);
setObj.add('prava');
setObj.add('Maria');

setObj.forEach(checkValue);

O/P :- 1 – 2 – prava – Maria

That’s it !!! We are done with the forEach statement of Javascript. Hope you are clear on the use of forEach control statement and hope you get to know how to use it. But even though it is pretty to use and upon using, the code looks much cleaner, there are some disadvantages of using forEach, which I will cover in my upcoming blog. So, stay tuned for more details and what to use & what not.

Do you find it useful? If yes, then please like and add some comments :). Thank you and I will be happy to hear from you 🙂 :).

Getting started with PHP on Azure

Hello Everyone, today let’s make ourselves ready to learn a new topic i.e. hosting PHP application on Azure. Many of us must have came across the word Azure and some of us must be knowing how to host the application written in PHP on it. Today we will go over how to host the application on Azure and how to auto-deploy the code through bitbucket. So, why to wait !! Lets start then :).

In this blog, we will mainly come across these following words.
1. PHP
2. Microsoft Azure
3. Bitbucket

1. PHP :-

“PHP is a server-side scripting language designed for web development but also used as a general-purpose programming language.” – wiki

Chicago Manual of Style, content style guide
The word PHP i.e. Hypertext Preprocessor earlier called as Personal Home Page. In 1994, Rasmus Lerdorf created this pretty language and in 1995, it came into existence as an open source technology. Because of its simplicity (as most of the syntax resembles to C, C++, Java), it is much popular in web development market and among the developers. One can take 100% advantage of using this language to make dynamic web pages quickly. It is a server side scripting language. Server side, as the name suggests, it runs on a web server and it requires a web browser to send/receive request/response. Scripting language, as the name suggests, it is only compiled when an interpreter reads it and convert it into machine understandable language.

But, first and foremost thing why developers love this technology is easy to learn, free of cost, platform independent and secure.

2. Microsoft Azure :-

“Microsoft Azure is a cloud computing platform and infrastructure created by Microsoft for building, deploying, and managing applications and services through a global network of Microsoft-managed data centers.” – wiki

Chicago Manual of Style, content style guide
The name Azure suggests, bright blue in colour like a cloudless sky. But in our context, this is little different :D. It is a platform which provides PaaS (Platform as a Service) and IaaS (Infrastructure as a Service) categories of cloud computing services. It supports many different programming languages including Microsoft and non-Microsoft related technologies. Azure was launched on 1st February 2010 as Windows Azure and then acquired the name as Microsoft Azure on 25th March 2014.

It is easy to publish and manage websites with PaaS environment. Mostly used for cloud computing, which literally means of using network to manage data, process and store which is hosted on remote servers rather than a local or personal server.

3. Bitbucket :-

“Bitbucket is a web-based hosting service for projects that use either the Mercurial (since launch) or Git (since October 2011) revision control systems.” – wiki

Chicago Manual of Style, content style guide
I hope everyone here are familiar with GIT, the version control system which is used for data integrity and support for distributed workflows. It is used to manage source code and the name satisfies as SCM, Source Code Management.

Bitbucket is the solution for professional teams who uses GIT. It offers hosting source code in free of cost and it has the option to add wikis for project & option to track issues. It is similar to Github which is used to manage the code for a distributed application.

Now, let’s start with setting up and host a PHP application on Azure.

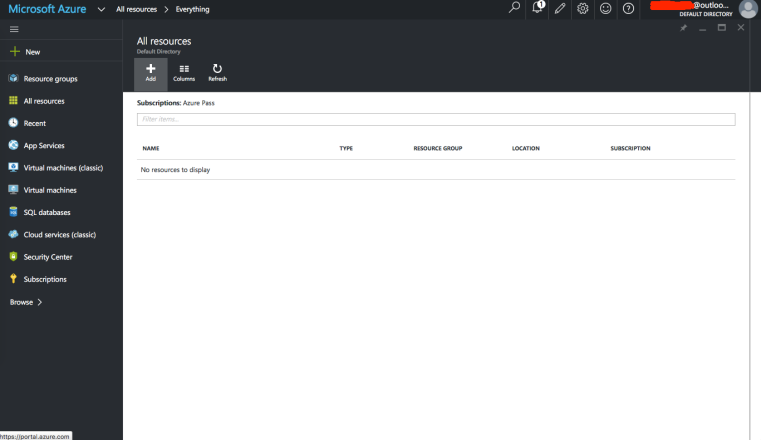
Step 1 :- First, we need to login into the account on Azure Portal. For that, we need to provide work or school or personal Microsoft account, otherwise need to create a new Microsoft account without any cost.

Once you successfully logged in into the system, it will redirect into Azure Portal page. See the below image for reference.

Screen Shot 2016-05-14 at 10.18.31 PM

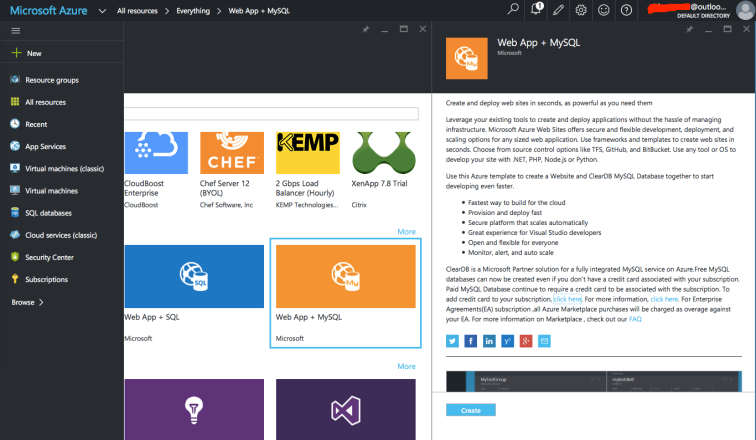
Step 2 :- Now, click on All Resources -> New button for creating the base/marketplace.

Screen Shot 2016-05-14 at 11.22.49 PM

Then select Web App + MySQL for hosting the application. Click on Create button for creating the hosting setup.

Screen Shot 2016-05-14 at 11.24.06 PM

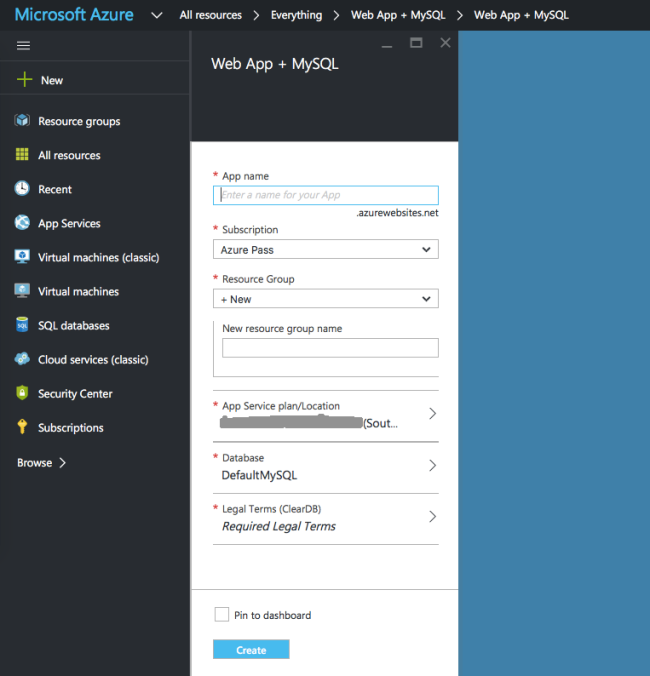
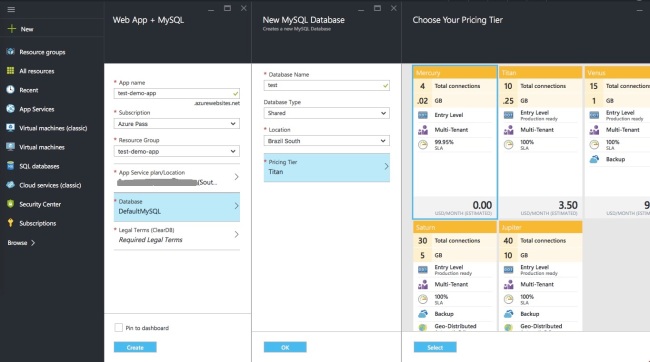
Step 3 :- Once you click on Create button, it will open one form to provide App Name, Subscription Details, Resource Group, Database Details and Legal Terms to accept. Provide a unique App Name as the website hosting name would be app_name.azurewebsites.net and the DB details (choose Database pricing tier as Mercury, the free one) as like below.

screen-shot-2016-05-14-at-11-25-18-pm

screen-shot-2016-05-14-at-11-27-15-pm

screen-shot-2016-05-15-at-1-01-44-am1

Step 4 :- Once you provide every information mentioned above, check Pin to dashboard option and click on Create. Now, it will start the process of deployment the server and it may take few time to complete the process.

submitting_deployment

Screen Shot 2016-05-16 at 12.33.44 PM

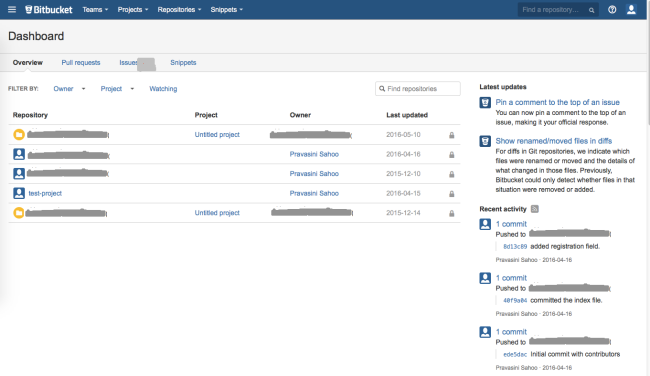
Step 5 :- Now lets go to Bitbucket (https://bitbucket.org/) and create the account. Do the Signup here (https://bitbucket.org/account/signup/) and you can see the Dashboard like the below once you successfully logged in into the system.

screen-shot-2016-05-16-at-12-45-25-pm

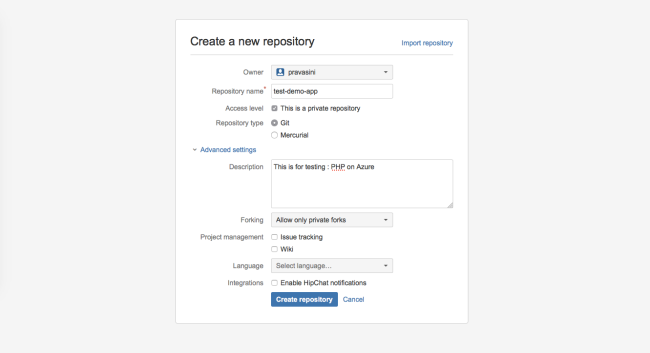
Step 6 :- Inside Bitbucket, go to Repositories -> Create Repository. Provide the necessary details there like below :
Screen Shot 2016-05-16 at 12.53.14 PM

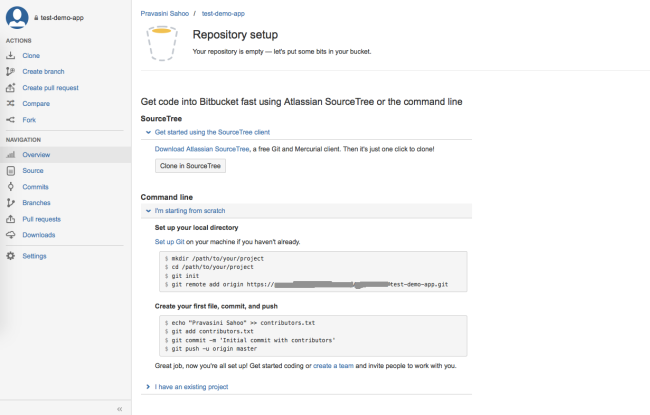
Once you Create Repository, it will show the dashboard for Repository setup and then select “I’m starting from scratch”.

screen-shot-2016-05-16-at-12-57-01-pm

Step 7 :- Open your Terminal to run some commands. Follow the rules mentioned in the above section i.e. “Set up your local directory”, “Create your first file, commit, and push”. For reference, do the following :

Set up Git on your machine if you haven’t already

Create your first file, commit, and push

  • phpinfo() >> phpinfo.php
  • git add phpinfo.php
  • git commit -m ‘Initial commit with phpinfo’
  • git push -u origin master

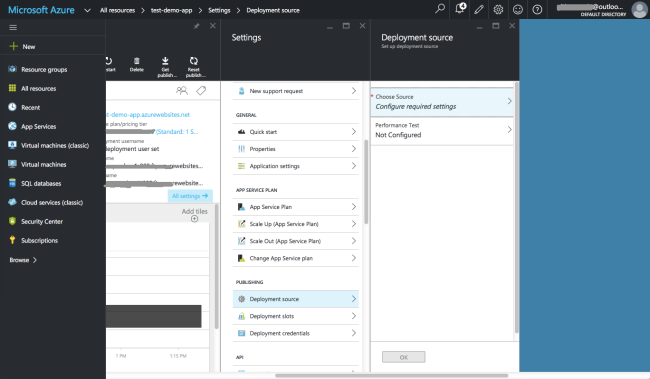
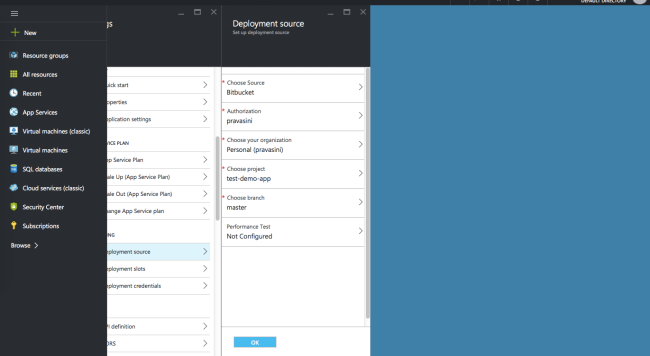
Step 8 :- Now time is to connect Azure with the deployment source for continuous integration. Again lets go to https://portal.azure.com and click on All Resources. Select the app we have created so far i.e. test-demo-app (type as App Service) and then choose Deployment Source from PUBLISHING section like below.

screen-shot-2016-05-16-at-1-23-33-pm

Step 9 :-

Click on Choose Source and select Bitbucket as the source. Provide the Authorization details of Bitbucket. Once Authorization is completed, it will ask to choose Project and branch. Provide all the details like below.

Screen Shot 2016-05-16 at 1.32.54 PM

Step 10 :- After providing the details and click on OK will start the source deployment and finally it will show one flash message as Successfully set up deployment source.

We are all DONE !!! 🙂 Now browse http://test-demo-app.azurewebsites.net/ (as we have provided the name as test-demo-app so far) and you can view the current PHP information for your server now.

Isn’t it cool & easy !!! 🙂 So, why to wait? Create one simple PHP page and host the application into Azure along with continuous integration using git Bitbucket. Do you really find it useful? If yes, then please like and add some comments, if you want.

Thanks and I will be happy to hear from you 🙂 :).

CSS: Nested Selector vs Modular Selector

Hello Everyone, today I am going to share on two different categories of selectors i.e. Nested Selector and Modular Selector. Let’s quickly jump to check 2 different style aspect without waiting for a moment.

Basically, there are 2 different categories of presenting the style –
1. Nested Selector (shortcut selector)
2. Modular Selector (flexible selector)

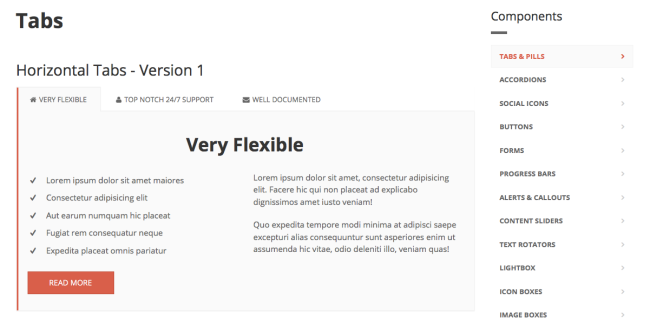
Let’s quickly go through one example to make it more clearer. Lets say we have to design the navigation section like below :

nested selector - 1

To design the navigation pad, the code will look like this :

<html>
<head>
    <title>Example of Nested Selector</title>

    <style type="text/css">
        .sidebar {
            box-sizing: border-box;
            float: right;

            .title {
                margin-bottom: 15px;
                margin-top: 20px;
                position: relative;
            }
        }

        .nav {
            list-style: outside none none;
            margin-bottom: 0;
            padding-left: 0;

            > li {
                display: block;
                position: relative;

                > a {
                    display: block;
                    padding: 10px 15px;
                    position: relative;
                }

                &.active {
                    > a {
                        background-color: #fafafa;
                        border: 1px solid #f3f3f3;
                        color: #e84c3d;

                        &:hover {
                            background-color: #fafafa;
                            border: 1px solid #f3f3f3;
                            color: #e84c3d;
                        }
                    }
                }
            }
        }
    </style>
</head>

<body>
<aside>
    <div class="sidebar">
        <h3 class="title">Components</h3>
        <div class="separator"></div>
        <nav>
            <ul class="nav nav-pills nav-stacked">
                <li class="active">
                    <a href="">Tabs & Pills</a>
                </li>
                <li><a href="">Accordions</a></li>
                .........
                <li><a href="">Image Boxes</a></li>
            </ul>
        </nav>
    </div>
</aside>
</body>
</html>

The above code is a simple example on how nested css can be written. But guys, did you find the problem with the above code. Can we use only .sidebar style (title with different css) in any other place in future?

No .. right!! As the styles are nested, we can not use the component separately as we want.

So, if we want to reuse each and every style what we have written so far, we have to use Modular way to design the style.

Lets check the same example in a Modular way !!

<html>
<head>
    <title>Example of Modular Selector</title>

    <style type="text/css">
        .sidebar {
            box-sizing: border-box;
            float: right;
        }

        .sidebar .title {
            margin-bottom: 15px;
            margin-top: 20px;
            position: relative;
        }

        .nav {
            list-style: outside none none;
            margin-bottom: 0;
            padding-left: 0;
        }

        .nav > li {
            display: block;
            position: relative;
        }

        .nav > li > a {
            display: block;
            padding: 10px 15px;
            position: relative;
        }

        .nav > li.active > a, .nav > li.active > a:hover {
            background-color: #fafafa;
            border: 1px solid #f3f3f3;
            color: #e84c3d;
        }
    </style>
</head>

<body>
<aside>
    <div class="sidebar">
        <h3 class="title">Components</h3>
        <div class="separator"></div>
        <nav>
            <ul class="nav nav-pills nav-stacked">
                <li class="active">
                    <a href="">Tabs & Pills</a>
                </li>
                <li><a href="">Accordions</a></li>
                .........
                <li><a href="">Image Boxes</a></li>
            </ul>
        </nav>
    </div>
</aside>
</body>
</html>

So, now can we use only .sidebar class for any other styles? A BIG YES right !!! 🙂

Nested selectors are more complex and those are less readable. But, it has its own advantages of targeting DOM elements. Maintainability is easy as, we just need to do fewer changes when the class name need to be changed later. The code will look concise and the selector looks pretty.

But, now-a-days CSS is getting more modular. It is modulated into different defaults, components, and settings and developer/designer should take 100% advantage of doing so. With modular CSS, coding is much easier like writing simple HTML. Styles will be consistent and easier to reuse the modules. Once the base been created, it would be easier to do modification in future. Then the subsequent development time will be very less. It simplify the code as clashes will not happen with this type of styling.

Much theories !! 😀 Ahh .. I know :).. Let’s stop then. Now you decide which one is better and why. Do you really find it useful? 🙂 If yes, then please like and add some comments, if you want.

Thanks 🙂 and I will be happy to hear from you 🙂 :).

CSS: Creating nested numbered list using CSS-Counters

Hello everyone, today I am going to share one basic thing, which you all may know about it. I am going to explain how can we create numbered list using CSS. So, let’s go through it quickly without wasting much of our time :).

HTML provides us few ways of creating lists. A list can be created using either of the following 3 ways i.e.

  • Unordered List
  • Ordered List
  • Description List

Let’s have a look at the results created by the above 3 lists –

counters-1counters-2counters-3

As the post title suggests, we will have our focus on Numbered List, we’ll consider only the case of Ordered List which alternatively known as Numbered List.

Let’s notice the default behavior of a numbered list. The sub-numbered list has started numbering from 1 to n, once again. Now, what if I need those to be numbered like 1.1, 1.2, 1.3… so on?

This can be done in various ways using Javascript OR CSS.. WAIT ! umm … CSS?
With alone CSS can we achieve this?

Yes, we can :). I know, the primary use of CSS is to describe the presentation semantics of an HTML document but, we can also use CSS for content generation. With the use of Content property along with pseudo-elements like :before, :after etc. we can inject a piece of content into an HTML element. But here our HERO is “CSS-Counters”. Let’s quickly go through this. There are 3 properties for CSS-counters –

  1. counter-reset: counter-name /* initializes or resets the counter */
  2. counter-increment: counter-name /* increments counter values */
  3. content: counter (counter-name) /* evaluates to counter value */

Let’s go through an example :

<!DOCTYPE html>
<html>
    <head>
        <style>
            body {
                counter-reset: section;
            }

            h1 {
                counter-reset: subsection;
            }

            h1:before {
                counter-increment: section;
                content: "Section " counter(section) ". ";
            }

            h2:before {
                counter-increment: subsection;
                content: counter(section) "." counter(subsection) " ";
            } 
        </style>
    </head>
    <body>
        <h1>Wordpress</h1>
        <h2><a href="https://pravasini.wordpress.com">https://pravasini.wordpress.com</a></h2>
        <h2><a href="http://suvendugiri.wordpress.com">http://suvendugiri.wordpress.com</a></h2>
        <h2><a href="http://tanmayabiswal.wordpress.com">http://tanmayabiswal.wordpress.com</a></h2>

        <h1>CodeProject</h1>
        <h2><a href="http://www.codeproject.com/Members/prava-mfs">http://www.codeproject.com/Members/prava-mfs</a></h2>
        <h2><a href="http://www.codeproject.com/Members/SuvenduShekharGiri">http://www.codeproject.com/Members/SuvenduShekharGiri</a></h2>
        <h2><a href="http://www.codeproject.com/Members/taditdash">http://www.codeproject.com/Members/taditdash</a></h2>

        <h1>Stack Overflow</h1>
        <h2><a href="http://stackoverflow.com/users/2269132/prava">http://stackoverflow.com/users/2269132/prava</a></h2>
        <h2><a href="http://stackoverflow.com/users/1006297/suvendu-shekhar-giri">http://stackoverflow.com/users/1006297/suvendu-shekhar-giri</a></h2>
    </body>
</html>

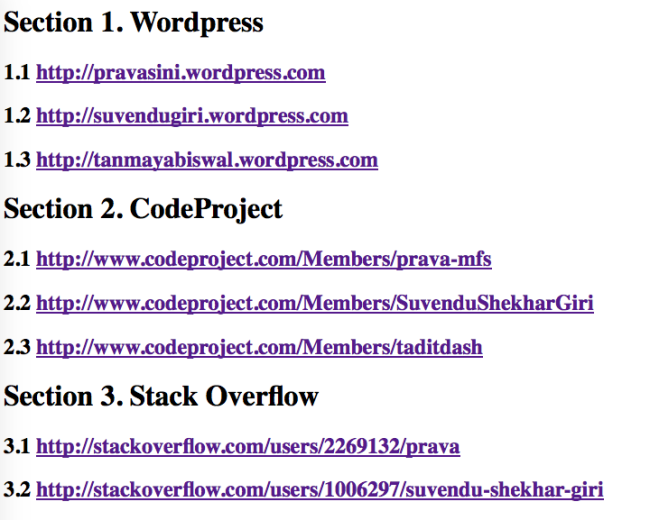
The above code will generate :
result

Isn’t it interesting!!! 🙂 Just using CSS, we can generate the contents as like above styling. Do you really find it useful? 🙂 If yes, then please like and add some comments, if you want.

Thanks 🙂 and will be happy to listen from you 🙂 :).

Handy tips to handle form submit using AJAX

Hello everyone, this time, I am going to explain different ways to handle form submit using AJAX.

Basically, to submit a form via AJAX, we need to follow certain process in our javascript file.

1- Process form submit event
2- Get all the form data using javascript/jQuery
3- Submit the form with data using AJAX
4- Show success/error message according to the result

So, in this blog, we are going to discuss different ways to get all the form data. Lets put some light into there :).

Tip – 1
Get all form data individually and put in key=>value format like below.

var formData = {
    'first_name'  : $('input[name=first_name]').val(),
    'last_name'   : $('input[name=last_name]').val(),
    'dob'         : $('input[name=dob]').val(),
    'gender'      : $('input[name=gender]').val(),
    'email'       : $('input[name=email]').val()
};

In short cut, one can write :

$("#form[name]").each(function(event, obj) {
    formData[obj.name] = $(obj).val();
});

Tip – 2
Instead of getting the data individually, we can use serialize() to get the data in string manner.

var formData = $("#formId").serialize();

The above code will produce the data in string manner i.e.

first_name=Rasmus&last_name=Lerdorf&dob=....

Tip – 3
We can use serializeObject() for serializing the data, which, instead of encoding form elements to string, converts form elements to a valid JSON object.

var formData = $("#formId").serializeObject();

Note: You need to include the below code to use serializeObject().

$.fn.serializeObject = function()
{
   var o = {};
   var a = this.serializeArray();
   $.each(a, function() {
       if (o[this.name]) {
           if (!o[this.name].push) {
               o[this.name] = [o[this.name]];
           }
           o[this.name].push(this.value || '');
       } else {
           o[this.name] = this.value || '';
       }
   });
   return o;
};

Using the above code, we can access the data using .(dot) operator i.e.

formData.first_name ==> Rasmus

Tip – 4
We also can use serializeArray(), which creates an array of objects (name and value) by serializing form values.

var formData = $("#formId").serializeArray();

After applying seriaizeArray(), we can get the data by looping through it i.e.

$.each(formData, function(event, field){
    $("#results").append(field.name + ":" + field.value + " ");
});

The above will print first_name:Rasmus last_name:Lerdorf dob:….

Tip – 5
We can use HTML5 formData() to achieve the same thing. It allows to compile a set of key/value pairs to send data using XMLHttpRequest.

var formObj = document.querySelector("form");
var formData = new FormData(formObj);

The output data will be in the same format that the form’s submit() method would be.

Okay!! That’s it… One can use any of the way mentioned above for accessing the form data. Do you really find it useful? 🙂 If yes, then please like and add some comments, if you want.

Thanks 🙂 and will be happy to listen from you 🙂 :).

Zend Framework 2 : Error & Exception Handling

Hello everyone, today I am going to share one problem I faced, when I was developing my first project with Zend Framework 2. The issue was with defining and managing error, exceptions. In the front-end, it was displaying errors/exceptions to the user, rather filing it into any file. It was too awkward for user to see the error message as kind of paragraph in the front-end :D.

So, that time, I thought of logging those errors/exceptions in a log file, for further check and fix for the issue, as we always do with any other framework/normal PHP projects. I searched for the native solution, it is present or not in the same Framework. I found the manual (though now-a-days we can find a lot of blogs/tutorials for solving error logging issue), where some logging code has been written, and which I thought would definitely help me to reach my goal.

So, what I did was – I just gone through the manual for error logging once, and believe me, I didn’t understand even 50% of the concept 😀 :D. That’s why I decided myself to keep patience and go through the same manual once again or twice.

Hmmm… after reading 3 more times, I got some points and I thought of using it in the code. Then, I checked and analyzed what should be the best position to use the logger code, so that it would help me as extent and I should not have to write the same code again and again.

So, here I am going to explain what attempt I had taken that time and it was successful also. Let’s check step by step process, of adding the logger for errors/exception.

1st Step
First attach to the dispatch error event inside Module.php (say in Application folder).

public function onBootstrap(MvcEvent $e)
{
    // other config code

    $sm = $e->getApplication()->getServiceManager();
    $sharedManager = $e->getApplication()->getEventManager()->getSharedManager();

    $sharedManager->attach('Zend\Mvc\Application', 'dispatch.error',
        function($e) use ($sm) {
            if ($e->getParam('exception')) {
                $sm->get('\Zend\Log\Logger')->crit($e->getParam('exception'));
                return false;
            }
        }
    );
}

2nd Step
Create service.config.php file (say Application/config/service.config.php).

return array(
    'factories' => array(
        // other config code ,
        '\Zend\Log\Logger' => function($sm){
            $logger = new Zend\Log\Logger;
            $writer = new Zend\Log\Writer\Stream('./data/logs/' . date('Y-m-d') . '-error.log');

            $logger->addWriter($writer);
            return $logger;
        },
    ),
);

Now, it’s done. The call anyway will go through bootstrap method and will log the error if any into one file. The path we used above for creating the log is inside ‘data/logs/’ directory. Do you really find it useful? 🙂 If yes, then please like and add some comments, if you want.

Thanks 🙂 and will be happy to listen from you 🙂 :).

Beginners guide on jQuery Selectors

In our previous blog, we went through almost all the major CSS selectors and I felt that was helpful for some and helpful for me as well. That’s why I came up with the same kind of way of selecting element using jQuery :).

As we know, jQuery is a light weight javascript library used to manipulate the DOM easily, for CSS manipulation, for effects and animations etc. So, in this blog, we will go through manipulating DOM using selector.

ID Selector :- Selects one element that has a given id attribute. Below example will apply black border to the element which id equals to ‘idMyTest’.

$("#idMyTest").css("border", "1px solid black");


Class Selector :- Selects one or more element that has the given class attribute. The below will apply black background to all the elements where the class defines as ‘class-my-test’ in the html document.

$(".class-my-test").css("border", "1px solid black");


Type Selector :- Selects every element that has the given type node. Type node can be ‘span’, ‘p'(paragraph), ‘div’, ‘a'(hyperlink), ‘img’ etc.. The example will add border to all the span present in the web document.

$("span").css("border", "1px solid black");


Descendant Combination Selector :- Selects all the elements with the type. For below example, it will select all elements inside elements. The below will apply the border to the hyperlink present inside or as child of span element.

$("span a").css("border", "1px solid black");


Link History Pseudo-Class Selector :- Selects all unvisited link only. The below will make all the link elements color as blue.

$("a:link").css("color", "blue");


User Action Pseudo-Class Selector :- Selects all matched elements which are activated by any user. The below example will make the color as green for the active buttons.

$("a:active").css("color", "green");


Universal Selector :- Selects every element of any type, that means apply style to all the attribute of the web page. Below will add green color to all the elements present in DOM.

$("*").css("color", "green");


User action pseudo-class Selectors :- Apply the styles on hover or on focus of any element. The below code will make the color red on hover of any link.

$("a:hover").css("color", "red");


Lang pseudo-class Selector :- Selects all the elements mentioned in the document language. The language value can be any 2-digit international language (en, fr, nl, de, etc..). The below will apply red color to the text which will be in english language.

$("div:lang(en-us)").css("color", "red");


Attribute Selector :- Selects matching string in the value attribute. The below example select all elements which have a title attribute and add a black border.

$("[title]").css("border", "1px solid black");


Structural pseudo-class Selector :- Selects the first-child of the given attribute. The below will select the first child (can be a span or div or p element) of span and apply black border to it.

$("div span:first-child").css("border", "1px solid black");


Child combination Selector :- Select the direct child elements of the mentioned parent/first selector. The below example will add border to the first span present inside the div.

$("div > span").css("border", "1px double black");


Adjacent sibling combination Selector :- Select an element immediately preceded by another element. For the below example, border will apply to <p> elements, placed immediately after <div> elements.

$("div + p").css("border", "1px double black");


Negation pseudo-class Selector :- Selects every element that is not of the given element type. The below example applies border to all the element present inside the div, except <p> element.

$("div:not(p)").css("border", "1px double black");


Target pseudo-class Selector :- Selects the element being the target of the referring URI. The below will add border to the ‘heading4′ text on click of ‘First’ link.

$("h4:target").css("border", "1px double black");


Enabled and Disabled pseudo-class Selector :- Select every enabled/disabled element. The below example will add green border to the enabled input element and gray border to the disabled input element.

$("input:enabled").css("border", "1px solid green");

$("input:disabled").css("border", "1px solid gray");


Selected-option pseudo-class Selector :- Select every checked input element i.e. will apply the style to the radio or select element. The below will make the option as red color on checked.

$("input:checked").css("color", "red");


Structural pseudo-class Selector :- It select the root element of the document or the web page. The example will make the background color as red for the root element in the hierarchy.

$(":root").css("background-color", "red");


Attribute Selector :- Selects every element whose attribute value begins with given string. The below will select every <a> element and make the color red, where href attribute value starts with “https”.

$("a[href^='https']").css("color", "red");


General sibling combinator Selector :- Selects the second element only if it is preceded by the first, and both share a common parent. The below will make red color to ‘Second Span’ text.

$("p ~ span").css("color", "red");

<span>First Span</span>
<p>Paragraph</p>
<div>Code Example</div>
<span>Second Span</span>


Negation pseudo-class Selector :- Same as CSS3 i.e. it selects every element that is not of the given element type. The only difference is in CSS3, it takes only a single selector list, where in CSS4, it takes multiple. The below will add the border to all html elements except the link.

$(":not(:link), :not(:visited)").css("border", "1px solid black");


Matches-any pseudo-class Selector :- Match with every element, provided in the attribute list. The below example will add border to the navigation, article, section and aside of the web page.

$("*:matches(nav, article, section, aside)").css("border", "1px solid black");


Local link pseudo-class Selector :- Matches links that point to the domain, where the current page stands for.

$("a[href^=#]").css("border", "1px solid black");


Default option pseudo-class Selector :- Selects the default element among others. The below will apply green as background color to the default button among all the buttons.

$(":default").css("background-color", "green");


Validity pseudo-class Selector :- Match the elements which has its value attribute come inside/outside the specified range. It is divided into 2 selectors i.e. :in-range and :out-of-range.

$("input:in-range").css("background-color", "green");

$("input:out-of-range").css("background-color", "red");


Optionality pseudo-class Selector :- Select every form element which are optional or required.

$("input:required").css("background-color", "red");

$("input:optional").css("background-color", "grey");


Mutability pseudo-class Selector :- Selects all the elements of the page, where the contents are writable or not.

$("input:read-only").css("background-color", "gray");

$("input:read-write").css("background-color", "green");


Miscellaneous :-

1. Animated Selector :- Select all elements that are undergoing animation.

$("img:animated").toggleClass("animated");


2. Attribute contains prefix Selector :- Selects element that starts with the specified attribute. The attribute value should either equal to or should start with that string followed by a hyphen (-). The below will apply outline to the first and third link, not to the second and fourth link.

<a title="test">First link</a>
<a title="this is a test">will not be outlined - second</a>
<a title="test-account">third link</a>
<a title="testing">will not be outlined - fourth</a>

$("a[title|='test']").css("border", "1px solid black");


3. Attribute contains Selector :- Selects all the elements that have the specified attribute in any part of the string. The below will apply outline to all except the second link.

<a title="test">First link</a>
<a title="account-check">will not be outlined - second</a>
<a title="test-account">third link</a>
<a title="testing">fourth link</a>

$("a[title*='test']").css("border", "1px solid black");


4. Attribute contains word Selector :- Selects the specified element which contains the specific word, delimited by a space. The below will apply the outline to the first link only.

<a title="test">First link</a>
<a title="account-check">will not be outlined - second</a>
<a title="test-account">will not be outlined - third</a>
<a title="testing">will not be outlined - fourth</a>

$("a[title~='test']").css("border", "1px solid black");


5. Attribute ends with Selector :- Selects all elements which have the specified attribute with ending exactly match with a given value. The below will apply the outline to first and fourth link.

<a title="test">First link</a>
<a title="account-check">will not be outlined - second</a>
<a title="test-account">will not be outlined - third</a>
<a title="account-test">fourth link</a>

$("a[title$='test']").css("border", "1px solid black");


6. Attribute starts with Selector :- Selects all elements which have the specified attribute with starting exactly match with a given value. The below will apply the outline to first and third link.

<a title="test">First link</a>
<a title="account-check">will not be outlined - second</a>
<a title="test-account">third link</a>
<a title="account-test">will not be outlined - fourth</a>

$("a[title^='test']").css("border", "1px solid black");


7. Attribute not equal Selector :- Selects all elements which does not match with the specified attribute in the string. Below will outline the second link.

<a title="test">will not be outlined - First</a>
<a title="account-check">second link</a>
<a title="test-account">third link</a>
<a title="account-test">fourth link</a>

$("a[title!='test']").css("border", "1px solid black");


8. :eq() Selector :- Select the x index element within the matched set. The below will apply red color to the 3rd list element.

$("li:eq(3)").css("color", "red");


9. :nth-child() Selector :- Selects nth child of the parent. The below will apply red color to the 3rd child of each unordered list.

$("ul li:nth-child(3)").css("color", "red");


10. :nth-last-child() Selector :- Selects nth child of the parent, counting from last to first. The below will apply red color to the 3rd child from last of each unordered list.

$("ul li:nth-last-child(3)").css("color", "red");


Great!! 🙂 We covered almost all the jQuery selector with small example. But, there can be more also, if we will combine two or more selected. Do you really find it useful? 🙂 If yes, then please like and add some comments, if you want.

Thanks 🙂 and will be happy to listen from you 🙂 :).

Beginners guide on CSS Selectors

As we all know about CSS (Cascading Style Sheets) is a language used for styling the web pages written in HTML, XML or XHTML. In CSS, selectors play a vital role to declare which part of the web page, the style applies to and it is done by matching the tags or attributes present in that web page. It’s very simple to write the tags or attributes for applying the selector, but need some tricks to precise and reuse it. Today in this post, we will go through the type of selectors, its advantages, introduced in every version of CSS.

CSS1 :-

ID Selector :- Selects one element that has a given id attribute. Below example will apply black border to the element which id equals to ‘idMyTest’.

#idMyTest {
    border: 1px solid black;
}


Class Selector :- Selects one or more element that has the given class attribute. The below will apply black background to all the elements where the class defines as ‘class-my-test’ in the html document.

.class-my-test {
    border: 1px solid black;
}


Type Selector :- Selects every element that has the given type node. Type node can be ‘span’, ‘p'(paragraph), ‘div’, ‘a'(hyperlink), ‘img’ etc.. The example will add border to all the span present in the web document.

span { 
    border: 1px solid black;
}


Descendant Combination Selector :- Selects all the elements with the type. For below example, it will select all elements inside elements. The below will apply the border to the hyperlink present inside or as child of span element.

span a {
    border: 1px solid black;
}


Link History Pseudo-Class Selector :- Selects all unvisited link only. The below will make all the link elements color as blue.

:link {
    color: blue;
}


User Action Pseudo-Class Selector :- Selects all matched elements which are activated by any user. The below example will make green as background color for the active buttons.

button:active {
    background-color: green;
}


CSS2 :-

Universal selector :- Selects every element of any type, that means apply style to all the attribute of the web page. Below will add black border to all the elements present in DOM.

* {
    border: 1px solid black;
}


User action pseudo-class selectors :- Apply the styles on hover or on focus of any element. The below code will make red background on hover of the element where the class name mentioned as ‘btn’.

.btn:hover {
    background-color: red;
}


Dir pseudo-class selector :- Select elements by its directionality based on the mentioned document language. The values are ‘ltr’ (left to right) and ‘rtl’ (right to left). The below will apply green background to the element where the text start from left to right, and applies red background to the element where the text start from right to left.

:dir(ltr) {
    background-color: green;
}

:dir(rtl) {
    background-color: red;
}


Lang pseudo-class selector :- Selects all the elements mentioned in the document language. The language value can be any 2-digit international language (en, fr, nl, de, etc..). The below will apply red color to the text which will be in english language.

:lang(en) {
    color: red;
}


Attribute selectors :- Selects matching string in the value attribute. The below example select all elements which have an title attribute and add a black border.

[title] {
    border: 1px solid black;
}


Structural pseudo-class selector :- Selects the first-child of the given attribute. The below will select the first child (can be a span or div or p element) of span and apply black border to it.

span :first-child {
    border: 1px solid black;
}


Child combination selector :- Select the direct child elements of the mentioned parent/first selector. The below example will add border to the first span present inside the div.

div > span {
    border: 1px solid black;
}


Adjacent sibling combination selector :- Select an element immediately preceded by another element. For the below example, border will apply to <p> elements, placed immediately after <div> elements.

div + p {
    border: 1px solid black;
}


CSS3 :-

Negation pseudo-class selector :- Selects every element that is not of the given element type. The below example applies border to all the element present inside the div, except <p> element.

div :not(p) { 
    border: 1px solid black; 
}


Target pseudo-class selector :- Selects the element being the target of the referring URI. The below will add border to the ‘heading4’ text on click of ‘First’ link.

h4:target {
    border: 1px solid black;
}
<h4 id="one">heading4</h4> 

<p>paragraph</p>
<div id="three">DIV</div>
<a href="#one">First</a>
<a href="#two">Second</a>
<a href="#three">Third</a>


Scope pseudo-class selector :- Match the elements that are a reference point for selectors to match against. The below will make lime background color for “Inside scope.”.

<div>
    It match the elements that are a reference point for selectors to match against.
    <section>Outside scope.</section>
    <section>Inside scope.</section>
    <section>Outside scope.</section>
</div>


Enabled and Disabled pseudo-class selectors :- Select every enabled/disabled element. The below example will add green border to the enabled input element and gray border to the disabled input element.

:enabled {
    border-color: green;
}
 
:disabled {
    border-color: gray;
}


Selected-option pseudo-class selector :- Select every checked input element i.e. will apply the style to the radio or select element. The below will make the option as red color on checked.

:checked {
    color: red;
}


Structural pseudo-class selectors :- It select the root element of the document or the web page. The example will make the background color as red for the root element in the hierarchy.

:root {
    background-color: red;
}


Attribute selectors :- Selects every element whose attribute value begins with given string. The below will select every <a> element and make the color red, where href attribute value starts with “https”.

a[href^="https"] {
    color: red;
}


General sibling combinator selector :- Selects the second element only if it is preceded by the first, and both share a common parent. The below will make red color to ‘Second Span’ text.

p ~ span {
  color: red;
}

<span>First Span</span>
<p>Paragraph</p>
<div>Code Example</div> 
<span>Second Span</span>


CSS4 :-

Negation pseudo-class selector :- Same as CSS3 i.e. it selects every element that is not of the given element type. The only difference is in CSS3, it takes only a single selector list, where in CSS4, it takes multiple. The below will add the border to all html elements except the link.

html|*:not(:link):not(:visited) { 
    border: 1px solid black; 
}


Matches-any pseudo-class selector :- Match with every element, provided in the attribute list. The below example will add border to the navigation, article, section and aside of the web page.

*|*:matches(nav, article, section, aside) { 
    border: 1px solid black; 
}


Local link pseudo-class selector :- Matches links that point to the domain, where the current page stands for.

:local-link(0) {
    border: 1px solid black; 
}


Time-dimensional pseudo-class selector :- As the name suggests, matches the elements according to currently active position in some timeline. It can be applied to the document, when video is displaying its subtitle or during speech recognition of a web document. This is divided into 3 pseudo class i.e. :current, :past, :future. While reading out an web page, the below example will highlight as green color whichever text is being read aloud currently, highlight as grey color whichever has been read/will read in future.

:current(p, li) { 
    background: green; 
}

:past(p, li), :future(p, li) { 
    background: grey; 
}


Indeterminate-value pseudo-class selector :- Represents any checkbox/radio element whose indeterminate DOM property is set to true using javascript.

input, span { 
    background: red;
}
:indeterminate, :indeterminate + span { 
    background: yellow;
}

<input id="chk_myExample" type="checkbox" />This is an Indeterminate-value pseudo-class selector example.

document.getElementById("chk_myExample").indeterminate = true;


Default option pseudo-class selector :- Selects the default element among others. The below will apply green as background color to the default button among all the buttons.

:default {
    background-color: green;
}
<form>
    <input id="submit1" type="submit" /> 
    <input id="submit2" type="submit" /> 
    <input id="reset" type="reset" />
</form>


Validity pseudo-class selectors :- Match the elements which has its value attribute come inside/outside the specified range. It is divided into 2 selectors i.e. :in-range and :out-of-range.

input:in-range {
    background-color: green;
}

input:out-of-range {
    background-color: red;
}


Optionality pseudo-class selectors :- Select every form element which are optional or required.

:required {
    border: red;
}
 
:optional {
    border: grey;
}


Mutability pseudo-class selectors :- Selects all the elements of the page, where the contents are writable or not.

:read-only {
    border: grey;
}
 
:read-write {
    border: green;
}


Structural pseudo-class selectors :- It is similar to CSS3 :nth-child() selector. The only difference is before entering into the document tree, it applies the style. The below style will be applied to the second last paragraph element of DOM tree.

p:nth-last-match(2n+1) { 
    border: 1px solid black; 
}


Grid-Structural pseudo-class selectors :- Styles different columns of a single grid/table in a document. The below will apply background color as green for the selected/highlighted column, apply yellow as background to each second column and apply grey color to each third column of the document.

:column(.highlight) {
    background-color: green;
}
 
:nth-column(2n+1) {
    background-color: yellow;
}
 
:nth-last-column(3n+1) {
    background-color: grey;
}


Attribute case-sensitivity selector :- It is similar to CSS2 [attribute] selector. The only difference is case sensitivity. It match with the element exactly with the provided attribute. The first example will apply red color to the element where id can be ‘mytestclass’, ‘mytestexample’, ‘mytestset’, ‘mytestlink’. But the second example will apply the color to the element where the id exactly match with the word ‘mytestid’.

a[id~="mytestid"] { 
    color: red;
}
a[id="mytestid"] {
    color: red;
}


Reference combinator :- This selector consists of two slashes separating two compound attributes. The below example will apply green color to the input element, whenever its label hovered or focused.

label:matches(:hover, :focus) /for/ input { 
    color: green; 
}


Subject of a selector with Child combinator selector :- Generally child combinator applies the styles to the last compound selector. But here, with “Subject of a selector with Child combinator selector”, we can apply the style to the prefixed selector object. The below style will add border to the ‘ul’ element instead of ‘li’ elements.

!ul > li {
    border: 1px solid black;
}


Hyperlink pseudo-class selector :- Apply the style to the elements that come as the source anchor of an hyperlink. The below example will have the blue background color for all link type elements.

:any-link {
    background-color: blue;
}


Ohh!! That’s so much really. This time, we went through almost all the selectors of CSS and with very small and simple example. Do you really find it useful? 🙂 If yes, then please like and add some comments, if you want.

Thanks 🙂 and will be happy to listen from you 🙂 :).

A walk through into Late Static Binding in PHP

Hello everyone, do we remember the concept of Static Binding and Dynamic Binding, the one we studied in Java classes during our college time?

Yes!! Then very nice :). Today in this blog, we will go through those concepts using PHP for better understanding and visibility for the persons like me :D.

What is Binding?
In simple software language, “connecting a method call, to the method body is known as binding”.


Types of Binding
There are two types of binding

  1. Static binding (early binding)
  2. Dynamic binding (late binding)


Example of static binding in PHP
Here in this case, class association is made during compile time.

<?php
class Vehicle {
    public function color() {
        echo 'car color is RED';
    }
}

$vehicle = new Vehicle();
$vehicle->color();
?>

This would print the output as : car color is RED


Example of dynamic binding in PHP
Here in this case, class association is not made until the object is created at execution time.

<?php
class Vehicle {
    public function color() {
        echo 'car color is RED';
    }
}

class Honda extends Vehicle {
    public function color() {
        echo 'car color is BLUE';
    }
}

$vehicle = new Honda();
$vehicle->color();
?>

This would print the output as : car color is BLUE


But, have you heard of another binding called “Late Static Binding”!! No…. then let’s go through that 🙂 with some interesting example.

What is Late Static Binding?
PHP 5.3 implemented a new feature called Late Static Binding, which is used to reference the called class regarding to static method inheritance.


Why the name Late Static Binding?
It is the combination of two concepts i.e. Late Binding and Static Binding.
Late binding comes from the fact that static:: keyword will not be resolved using the class where the method is defined but it will rather be computed using runtime information.
Static binding comes from the fact that it can be used for (but is not limited to) static method calls.


Why it came into the picture?
To overcome the use of self keyword, Late static binding concept came. self does not follow the rules of inheritance and it always resolves to the class in which it is used. For example – if you make a method in a parent class and call it from a child class, self will always reference the parent, instead of child.

But in case of Late Static Binding, static keyword has been used extensively to represent the class where it is first used i.e. it binds to the runtime class.


Example of late static binding in PHP with self, parent and static

<?php

class Mango {       
    function classname(){
        return __CLASS__;
    }
    
    function selfname(){
        return self::classname();
    }
    
    function staticname(){
        return static::classname();
    }
}

class Orange extends Mango {     
    function parentname(){
        return parent::classname();
    }
    
    function classname(){
        return __CLASS__;
    }
}

class Apple extends Orange {     
    function parentname(){
        return parent::classname();
    }
    
    function classname(){
        return __CLASS__;
    }
}

$apple = new Apple();
echo $apple->selfname() . '<br/>';
echo $apple->parentname() . '<br/>';
echo $apple->staticname();

?>

This would print the output as :
Mango
Orange
Apple


Example of late static binding in PHP with forward_static_call()

<?php

class Mango
{
    const NAME = 'Mango is';
    public static function fruit() {
        $args = func_get_args();
        echo static::NAME, " " . join(' ', $args) . "<br/>";
    }
}

class Orange extends Mango
{
    const NAME = 'Orange is';

    public static function fruit() {
        echo self::NAME, "<br/>";
        
        forward_static_call(array('Mango', 'fruit'), 'my', 'favorite', 'fruit');
        forward_static_call('fruit', 'my', 'father\'s', 'favorite', 'fruit');
    }
}

Orange::fruit('NO');

function fruit() {
    $args = func_get_args();
    echo "Apple is " . join(' ', $args);
}

?>

This would print the output as :
Orange is
Orange is my favorite fruit
Apple is my father’s favorite fruit


Example of late static binding in PHP with get_called_class()

<?php

class Mango {
    static public function fruit() {
        echo get_called_class() . "<br/>";
    }
}

class Orange extends Mango {
    //
}

Mango::fruit();
Orange::fruit();

?>

This would print the output as :
Mango
Orange

So, did you get some idea of method overriding or binding? Do you really find it useful? 🙂 If yes, then please like and add some comments, if you want.

Thanks 🙂 and will be happy to listen from you 🙂 :).

HTML5: Geolocation from the ground up

The word Geolocation is the combination of two words Geo (Geographic) and Location. Yes, that means, Geolocation is the way of getting geographic location of the object. It uses the positioning system logic, for getting the location. The HTML Geolocation is secured and that’s the reason, it won’t show the position till user approves for it.

Hmmm… the word Geolocation sounds interesting … right? 🙂 So, why to wait? Lets check deeper part of Geolocation API.

Geolocation has never been part of HTML5 specification, previously called Web Application Specification. It is created by W3C not the WHATWG. We can use geolocation in multiple ways, like –

  • Social networking services for ex-Facebook is using Geolocation extensively, for getting current places, that allow users to share their location to others.
  • It helps user to guide for the direction, they want.
  • Anyone can share their location with others.
  • Users can be aware of what is around them depending upon their interests.

But, let’s think practically, how it is possible to get current location of any person, without using anything ❓ …

Hmmm… :idea:, we just now came across one word “Sharing”, means user need to share his/her location using some API and it might sound like a privacy concern. But, the specification clearly specify that the user have to first allow the user agent so it can share the location with the server.

According to GeoLocation API Specification, “User agents must not send location information to Web sites without the express permission of the user. User agents must acquire permission through a user interface, unless they have prearranged trust relationships with users, as described below. The user interface must include the URI of the document origin.”

When requesting for authorization, the browsers may show alert message to the user. Let’s check how it works with some browsers.

Firefox :-
Screen Shot 2014-11-03 at 6.08.19 pm

Chrome :-
Screen Shot 2014-11-03 at 6.06.38 pm

Safari :-
Screen Shot 2014-11-03 at 6.09.30 pm

Once a user allows the user agent to share the user location with the server, there are still some privacy concerns:

  • What would be the duration of saving location data
  • Will it be shared to other sites or other users
  • What would be the result, if the location data can be deleted/updated by end user

That’s why, according to Geolocation API Specification, “Recipients must clearly and conspicuously disclose the fact that they are collecting location data, the purpose for the collection, how long the data is retained, how the data is secured, how the data is shared if it is shared, how users may access, update and delete the data, and any other choices that users have with respect to the data.”.

According to Geolocation API Specification, “Common sources of location information include Global Positioning System (GPS) and location inferred from network signals such as IP address, RFID, WiFi and Bluetooth MAC addresses, and GSM/CDMA cell IDs, as well as user input”.

The geolocation API is located in the Geolocation object. There are some methods which are available with Geolocation API, among those, 2 methods (getCurrentPosition() and watchPosition()) are used to get the location of the user.

Let’s check one example with using the above two methods.

<!DOCTYPE html>
<html>
    <head>
        <title>Geolocation API Test</title>
    </head>
    <body onload="getLocation()">
        <script>
            function getLocation() {
                if (navigator.geolocation) {
                    navigator.geolocation.getCurrentPosition(showPosition);
                } else { 
                    alert("Geolocation is not supported by this browser.");
                }
            }

            function showPosition(position) {
                alert("Latitude: " + position.coords.latitude + " - Longitude: " + position.coords.longitude);	
            }
        </script>
    </body>
</html>

getCurrentPosition() :-
It gets the user location only once. It takes 3 parameters i.e. showLocation, ErrorHandler, options.
showLocation => It is the callback method which retrieves the current location of the user. It always called asynchronously and method returns Position as an object. There are few properties present for that Position object.

  • coords.latitude => To get the latitude of the location
  • coords.longitude => To get the longitude of the location
  • coords.accuracy => To get the accuracy of the position returned
  • coords.altitude => To get the altitude of the position above sea level[optional]
  • coords.altitudeAccuracy => To get the accuracy of the altitude position[optional]
  • coords.heading => To get the device current location as per degree, clockwise from North[optional]
  • coords.speed => To get the speed in meter per second[optional]
  • timestamp => To get the timestamp for the response[optional]

ErrorHandler => This is an optional parameter. It invoked when any error occurs while calling PositionError object.
options => This is also an optional parameter. This can contain many options for getting location information like use of the locations which is already in cache, check for the accuracy of the location info, get the timeout info while getting location info.

watchPosition() :-
It regular checks the user location and check if the user location has changed. It also takes 3 parameters i.e. showLocation, ErrorHandler, options, which description we already went through.

This method returns an unique id, which can be used to cancel getting the regular location updates.

clearWatch() :-
There are one more method available clearWatch(), which cancels/stops watching position of the user. It takes one parameter i.e. watchId.
watchId => It is an unique ID of the watchPosition call to cancel the current call.

So, what do you think!! It is nice to use … right? 🙂 Hmmm… yes, using Geolocation API, we can get the geographic location of the user, using which, we can do a lot stuff :).

Note :- Please check here for Browser support details.

Thanks 🙂 and will be happy to listen from you 🙂 :).

Version Control with Subversion: Tortoise SVN – III

Hello All, I am here again with some more SVN commands which you may like or which may help you, while using SVN for any app :).

This is the continuous part of Version Control with Subversion and the previous two are listed below.

1 – Version Control with Subversion: Tortoise SVN
2 – Version Control with Subversion: Tortoise SVN – II

This time, we will check some more SVN useful commands, and let’s jump into the SVN sea, without wasting our time :-D.

svn diff <Old File Path> <New File Path>

This plays a big role in SVN commands and while managing the code. This command helps to display the differences between two revisions or paths, so that developers can check what has been changed by any other developer or by herself/himself with effect to different dates.

Options
1. -r [--revision] ARG -> ARG (some commands also take ARG1:ARG2 range), a revision argument can be NUMBER(revision number), DATE(revision at start of the date), HEAD(latest in repository), BASE(base rev of item’s working copy), COMMITTED(last commit at or before BASE), PREV(revision just before COMMITTED)
2. -c [--change] ARG -> The change made by revision ARG (like -r ARG-1:ARG). If ARG is negative this is like -r ARG:ARG-1
3. --old ARG -> Use ARG as the older target
4. --new ARG -> Use ARG as the newer target
5. --depth ARG -> Limit operation by depth ARG (’empty’, ‘files’, ‘immediates’, or ‘infinity’)
6. --diff-cmd ARG -> Use ARG as diff command
7. --internal-diff -> Override diff-cmd specified in config file
8. -x [--extensions] ARG -> Default: ‘-u’. -u (–unified), -b (–ignore-space-change), -w (–ignore-all-space), –ignore-eol-style(Ignore changes in EOL style), -p (–show-c-function).
9. --no-diff-deleted -> Do not print differences for deleted files
10. --show-copies-as-adds -> Don’t diff copied or moved files with their source
11. --notice-ancestry -> Notice ancestry when calculating differences
12. --summarize -> Show a summary of the results
13. --changelist [--cl] ARG -> Operate only on members of changelist ARG
14. --force -> Force operation to run
15. --xml -> Output in XML
16. --git -> Use git’s extended diff format

svn revert <File Name>

As the name implies, it reverts/undo all the local changes or it also used to resolve any file in conflicted state.

Options
1. --targets ARG -> Pass contents of file ARG as additional args
2. -R [--recursive] -> Descend recursively, same as –depth=infinity
3. --depth ARG -> Limit operation by depth ARG (’empty’, ‘files’, ‘immediates’, or ‘infinity’)
4. -q [--quiet] -> Print nothing, or only summary information
5. --changelist [--cl] ARG -> Operate only on members of changelist ARG

svn resolve <File Path>

This command is helpful to resolve conflicts on the files or directories.

Options
1. --targets ARG -> Pass contents of file ARG as additional args
2. -R [--recursive] -> Descend recursively, same as –depth=infinity
3. --depth ARG -> Limit operation by depth ARG (’empty’, ‘files’, ‘immediates’, or ‘infinity’)
4. -q [--quiet] -> Print nothing, or only summary information
5. --accept ARG -> Specify automatic conflict resolution source (‘base’, ‘working’, ‘mine-conflict’, ‘theirs-conflict’, ‘mine-full’, ‘theirs-full’)

svn cleanup <File Path>

This command is required to cleanup the working copy recursively. Mainly, it is needed when the working copy has been locked, while any issues/conflicts.

Options
1. --diff3-cmd ARG -> Use ARG as merge command

svn merge <Source File Path> <Target File Path>

This command is used to merge the differences between source files to a working copy path. If anyone will not provide target file path, then the changes will be applied to the current working directory.

Options
1. -r [--revision] ARG -> ARG (some commands also take ARG1:ARG2 range), a revision argument can be NUMBER(revision number), DATE(revision at start of the date), HEAD(latest in repository), BASE(base rev of item’s working copy), COMMITTED(last commit at or before BASE), PREV(revision just before COMMITTED)
2. -c [--change] ARG -> The change made by revision ARG (like -r ARG-1:ARG). If ARG is negative this is like -r ARG:ARG-1
3. --depth ARG -> Limit operation by depth ARG (’empty’, ‘files’, ‘immediates’, or ‘infinity’)
4. -q [--quiet] -> Print nothing, or only summary information
5. --force -> Force operation to run
6. --dry-run -> Try operation but make no changes
7. --diff3-cmd ARG -> Use ARG as merge command
8. --record-only -> Merge only mergeinfo differences
9. -x [--extensions] ARG -> When Subversion is invoking an external diff program, ARG is simply passed along to the program. But when Subversion is using its default internal diff implementation, or when Subversion is displaying blame annotations, ARG could be -u (–unified), -b (–ignore-space-change), -w (–ignore-all-space), –ignore-eol-style, -p (–show-c-function).
10. --ignore-ancestry -> Ignore ancestry when calculating merges
11. --accept ARG -> Specify automatic conflict resolution action (‘postpone(p)’, ‘working’, ‘base’, ‘mine-conflict(mc)’, ‘theirs-conflict(tc)’, ‘mine-full(mf)’, ‘theirs-full(tf)’, ‘edit(e)’, ‘launch(l)’)
12. --reintegrate -> Merge a branch back into its parent branch
13. --allow-mixed-revisions -> Allow merge into mixed-revision working copy. Use of this option is not recommended! Please run ‘svn update’ instead.

Ohh!! that’s a lot guys 🙂 … We went through almost all the basic commands, that could be required, on SVN usage. We listed all the options for each command, which could be possible with the main command.

In my next blog, we will go through the process of creating project, managing the project with the commands, we already went through. So, STAY TUNED for my next blog, that will cover some more commands. Hope you will like this blog.

Thanks 🙂 and will be happy to listen from you 🙂 :).

Version Control with Subversion: Tortoise SVN – II

Hello everyone, I am back again with your demand for SVN commands. This time, we will go through all usual commands which may be needed while using SVN :).

So, let’s not waste our time, and let’s go and check the commands one by one :).

svn help

The name itself suggests ‘HELP’. Yes, it will assist the new/old user to use SubVersion. There are a lot more subcommands like checkout, commit, update, add, blame, revert, relocate, resolve, … etc., which can be used with svn help like svn help <subcommand> to get individual brief details for that subcommand.

svn ls <URL of Repo> OR svn list <URL of Repo>

This command will list all the directories or files list, in the repository.

Options
1. -r [--revision] ARG -> ARG (some commands also take ARG1:ARG2 range), a revision argument can be NUMBER(revision number), DATE(revision at start of the date), HEAD(latest in repository), BASE(base rev of item’s working copy), COMMITTED(last commit at or before BASE), PREV(revision just before COMMITTED)
2. -v [--verbose] -> Print extra information
3. -R [--recursive] -> Descend recursively, same as –depth=infinity
4. --depth ARG -> Limit operation by depth ARG (’empty’, ‘files’, ‘immediates’, or ‘infinity’)
5. --incremental -> Give output suitable for concatenation
6. --xml -> Output in XML

svn co <URL of Repo> OR svn checkout <URL of Repo>

This command will checkout a working copy from the given repository.

Options
1. -r [--revision] ARG -> ARG (some commands also take ARG1:ARG2 range), a revision argument can be NUMBER(revision number), DATE(revision at start of the date), HEAD(latest in repository), BASE(base rev of item’s working copy), COMMITTED(last commit at or before BASE), PREV(revision just before COMMITTED)
2. -q [--quiet] -> Print nothing, or only summary information
3. --depth ARG -> Limit operation by depth ARG (’empty’, ‘files’, ‘immediates’, or ‘infinity’)
4. --force -> Force operation to run
5. --ignore-externals -> Ignore externals definitions

svn up <URL of Repo> OR svn update <URL of Repo>

This command will help to update the working copy, which will finally sync with the Subversion repository.

Options
1. -r [--revision] ARG -> ARG (some commands also take ARG1:ARG2 range), a revision argument can be one of NUMBER(revision number), DATE(revision at start of the date), HEAD(latest in repository), BASE(base rev of item’s working copy), COMMITTED(last commit at or before BASE), PREV(revision just before COMMITTED).
2. --depth ARG -> Limit operation by depth ARG (’empty’, ‘files’, ‘immediates’, or ‘infinity’)
3. --set-depth ARG -> set new working copy depth to ARG (‘exclude’, ’empty’, ‘files’, ‘immediates’, or ‘infinity’)
4. -q [--quiet] -> Print nothing, or only summary information
5. --diff3-cmd ARG -> Use ARG as merge command
6. --force -> Force operation to run
7. --ignore-externals -> Ignore externals definitions
8. --changelist [--cl] ARG -> Operate only on members of changelist ARG
9. --editor-cmd ARG -> Use ARG as external editor
10. --accept ARG -> Specify automatic conflict resolution action (‘postpone(p)’, ‘working’, ‘base’, ‘mine-conflict(mc)’, ‘theirs-conflict(tc)’, ‘mine-full(mf)’, ‘theirs-full(tf)’, ‘edit(e)’, ‘launch(l)’)
11. --parents -> Make intermediate directories

svn add <File Name>

This command will help to add files or directories, subdirectories or symlinks to repositories.

Options
1. --targets ARG -> Pass contents of file ARG as additional args
2. --depth ARG -> Limit operation by depth ARG (’empty’, ‘files’, ‘immediates’, or ‘infinity’)
3. -q [--quiet] -> Print nothing, or only summary information
4. --force -> Force operation to run
5. --no-ignore -> Disregard default and svn:ignore property ignores
6. --auto-props -> Enable automatic properties
7. --no-auto-props -> Disable automatic properties
8. --parents -> Add intermediate parents

svn delete <File Name>

This will help user to delete an item from working copy or working repository.

Options
1. --force -> Force operation to run
2. -q [--quiet] -> Print nothing, or only summary information
3. --targets ARG -> Pass contents of file ARG as additional args
4. -m [--message] ARG -> Specify log message ARG
5. -F [--file] ARG -> Read log message from file ARG
6. --force-log -> Force validity of log message source
7. --editor-cmd ARG -> Use ARG as external editor
8. --encoding ARG -> Treat value as being in charset encoding ARG
9. --with-revprop ARG -> Set revision property ARG in new revision using the name[=value] format
10. --keep-local -> Keep path in working copy

svn copy <From File Path> <To File Path>

This command is required to copy a file or directory in a working copy or in the repository. It needs to paths as argument, one is from file path and another is to file path.

Options
1. -r [--revision] ARG -> ARG (some commands also take ARG1:ARG2 range), a revision argument can be NUMBER(revision number), DATE(revision at start of the date), HEAD(latest in repository), BASE(base rev of item’s working copy), COMMITTED(last commit at or before BASE), PREV(revision just before COMMITTED)
2. -q [--quiet] -> Print nothing, or only summary information
3. --ignore-externals -> Ignore externals definitions
4. --parents -> Make intermediate directories
5. -m [--message] ARG -> Specify log message ARG
6. -F [--file] ARG -> Read log message from file ARG
7. --force-log -> Force validity of log message source
8. --editor-cmd ARG -> Use ARG as external editor
9. --encoding ARG -> Treat value as being in charset encoding ARG
10. --with-revprop ARG -> Set revision property ARG in new revision using the name[=value] format

svn move <From File Path> <To File Path>

This command is used to move one file or item from one place to another in a working copy or repository. This is purely equivalent to first copy the file content from one place to another and then delete the file from where copy content has been made.

Options
1. -r [--revision] ARG -> ARG (some commands also take ARG1:ARG2 range), a revision argument can be NUMBER(revision number), DATE(revision at start of the date), HEAD(latest in repository), BASE(base rev of item’s working copy), COMMITTED(last commit at or before BASE), PREV(revision just before COMMITTED)
2. -q [--quiet] -> Print nothing, or only summary information
3. --force -> Force operation to run
4. --parents -> Make intermediate directories
5. -m [--message] ARG -> Specify log message ARG
6. -F [--file] ARG -> Read log message from file ARG
7. --force-log -> Force validity of log message source
8. --editor-cmd ARG -> Use ARG as external editor
9. --encoding ARG -> Treat value as being in charset encoding ARG
10. --with-revprop ARG -> Set revision property ARG in new revision using the name[=value] format

svn status <File Path>

This command is used to print the status of working copy files and directories.

Options
1. -u [--show-updates] -> Display update information
2. -v [--verbose] -> Print extra information
3. --depth ARG -> Limit operation by depth ARG (’empty’, ‘files’, ‘immediates’, or ‘infinity’)
4. -q [--quiet] -> Don’t print unversioned items
5. --no-ignore -> Disregard default and svn:ignore property ignores
6. --incremental -> Give output suitable for concatenation
7. --xml -> Output in XML
8. --ignore-externals -> Ignore externals definitions
9. --changelist [--cl] ARG -> Operate only on members of changelist ARG

😎 … Really interesting ones!!! 🙂 There are a lot of options available for each and every SVN commands, and which will make a programmer’s life much easier than not using any SubVersion mechanism.

But, there are still some more commands we have, which will be helpful while dealing with one project/application. So, STAY TUNED for my next blog, that will cover some more commands. Hope you will like this blog.

Thanks 🙂 and will be happy to listen from you 🙂 :).

CSS3: Multiple Column Layout

The name Multiple Column Layout suggests a new way to arrange the text like newspaper-wise, which has better flexibility for viewing the page for the viewers. Multi Column Layout is actually a module, with having block layout mode for smoothing definition of multiple columns of text.

Ummm… difficult to understand 😦 … Hmmm… same thing happening to me too :-(. Then, why to wait!!! Let’s check with some example.

This is the HTML code which we will use for demo purpose with adding below styles.

<!DOCTYPE html> 
<html>
    <head> 
        <style> 
            div { 
                -webkit-column-count: 3; /* Chrome, Safari, Opera */ 
                -moz-column-count: 3; /* Firefox */ 
                column-count: 3; 
            } 
        </style> 
    </head> 
    <body> 
        <div> 
            Lorem ipsum dolor sit amet, consectetur adipiscing elit. Pellentesque rutrum auctor egestas. Vivamus malesuada felis quis ipsum dapibus sagittis. Maecenas quis tempor eros. Pellentesque tempor ex vel dictum pharetra. Maecenas id hendrerit enim. Phasellus a urna nec elit imperdiet mollis. Donec gravida augue ut aliquam accumsan. Suspendisse potenti. Pellentesque habitant morbi tristique senectus et netus et malesuada fames ac turpis egestas. Proin orci elit, volutpat sed dapibus quis, ornare a augue. Aliquam purus arcu, pharetra quis gravida eget, ultrices at est. Donec sodales ac felis ac ullamcorper. Nullam ac tortor diam. Mauris blandit quis enim nec luctus. Curabitur pharetra libero auctor tincidunt scelerisque. Aliquam sodales sagittis ipsum eget sodales. Proin vel ante gravida, efficitur leo et, dignissim odio. Vestibulum erat enim, suscipit id luctus sit amet, convallis sit amet erat. Integer sagittis metus orci, sit amet condimentum elit pretium nec. Phasellus quis metus nunc. Sed fringilla leo semper, tempor risus eget, elementum ipsum. Curabitur at aliquet felis. Lorem ipsum dolor sit amet, consectetur adipiscing elit. Sed pretium nunc lacus, vel ultrices libero accumsan vitae. In eleifend, velit non facilisis rhoncus, ligula felis aliquet tellus, cursus bibendum sapien erat vitae est. Vivamus laoreet metus sed sapien venenatis accumsan. Phasellus aliquam hendrerit felis. Sed semper fermentum feugiat. Aliquam tempor volutpat lorem, ac tempor enim lacinia sed. Mauris vulputate, mi semper aliquet lacinia, odio massa commodo lorem, nec convallis mi urna vitae neque. Nunc leo mauris, gravida vitae tincidunt vel, elementum ac sem. Aenean vel porttitor nisi. Donec aliquet ullamcorper risus ac vulputate. Aliquam in eleifend augue. Cras mattis, neque in efficitur feugiat, mi orci euismod risus, non bibendum leo tortor tincidunt ipsum. Morbi dapibus nisl eget sodales gravida. Pellentesque facilisis nibh vel urna ultrices, ac tincidunt urna semper. Integer tincidunt velit at dolor gravida, vitae gravida velit rhoncus. Cras sollicitudin fermentum orci, vel bibendum arcu sodales non.         
        </div> 
    </body> 
</html>

So, let’s go through the properties of Multiple Column Layout one by one to check how it works –

Multiple Column Properties

1) column-count – Specifies the number of columns an element should be divided into

column-count: number|auto|initial|inherit;
div {
    -webkit-column-count: 3; /* Chrome, Safari, Opera */
    -moz-column-count: 3; /* Firefox */
    column-count: 3;
}

Screen Shot 2014-10-20 at 1.55.41 pm

2) column-fill – Specifies how to fill columns

column-fill: balance|auto|initial|inherit;
div {
    -webkit-column-count: 3; /* Chrome, Safari, Opera */
    -moz-column-count: 3; /* Firefox */
    column-count: 3;

    -moz-column-fill: auto; /* Firefox */
    column-fill: auto;
}

Screen Shot 2014-10-20 at 2.08.03 pm

3) column-gap – Specifies the gap between the columns

column-gap: length|normal|initial|inherit;
div {
    -webkit-column-count: 3; /* Chrome, Safari, Opera */
    -moz-column-count: 3; /* Firefox */
    column-count: 3;

    -webkit-column-gap: 60px; /* Chrome, Safari, Opera */
    -moz-column-gap: 60px; /* Firefox */
    column-gap: 60px;
}

Screen Shot 2014-10-20 at 2.11.08 pm

4) column-rule – A shorthand property for setting all the column-rule-* properties

column-rule: column-rule-width column-rule-style column-rule-color|initial|inherit;
div {
    -webkit-column-count: 3; /* Chrome, Safari, Opera */
    -moz-column-count: 3; /* Firefox */
    column-count: 3;

    -webkit-column-rule: 5px outset #16a085; /* Chrome, Safari, Opera */
    -moz-column-rule: 5px outset #16a085; /* Firefox */
    column-rule: 5px outset #16a085;
}

Screen Shot 2014-10-20 at 2.19.03 pm

5) column-rule-color – Specifies the color of the rule between columns

column-rule-color: color|initial|inherit;
div {
    -webkit-column-count: 3; /* Chrome, Safari, Opera */
    -moz-column-count: 3; /* Firefox */
    column-count: 3;

    -webkit-column-gap: 60px; /* Chrome, Safari, Opera */
    -moz-column-gap: 60px; /* Firefox */
    column-gap: 60px;
}

Screen Shot 2014-10-20 at 2.26.54 pm

6) column-rule-style – Specifies the style of the rule between columns

column-rule-style: none|hidden|dotted|dashed|solid|double|groove|ridge|inset|outset|initial|inherit;
div {
    /* Chrome, Safari, Opera */
    -webkit-column-count: 3;
    -webkit-column-gap: 60px;
    -webkit-column-rule-style: dashed;

    /* Firefox */
    -moz-column-count: 3;
    -moz-column-gap: 60px;
    -moz-column-rule-style: dashed;

    column-count: 3;
    column-gap: 60px;
    column-rule-style: dashed;
}

Screen Shot 2014-10-20 at 2.30.01 pm

7) column-rule-width – Specifies the width of the rule between columns

column-rule-width: medium|thin|thick|length|initial|inherit;
div {
    /* Chrome, Safari, Opera */
    -webkit-column-count: 3;
    -webkit-column-gap: 60px;
    -webkit-column-rule-style: outset;
    -webkit-column-rule-width: 20px;
    -webkit-column-rule-color: #16a085;

    /* Firefox */
    -moz-column-count: 3;
    -moz-column-gap: 60px;
    -moz-column-rule-style: outset;
    -moz-column-rule-width: 20px;
    -moz-column-rule-color: #16a085;

    column-count: 3;
    column-gap: 60px;
    column-rule-style: outset;
    column-rule-width: 20px;
    column-rule-color: #16a085;
}

Screen Shot 2014-10-20 at 2.33.28 pm

8) column-span – Specifies how many columns an element should span across

column-span: 1|all|initial|inherit;
div {
    -webkit-column-count: 3; /* Chrome, Safari, Opera */
    -moz-column-count: 3; /* Firefox */
    column-count: 3;
}

h1 {
    -webkit-column-span: all; /* Chrome, Safari, Opera */
    column-span: all;
}

Screen Shot 2014-10-20 at 2.40.44 pm

9) column-width – Specifies the width of the columns

column-width: auto|length|initial|inherit;
div {
    -webkit-column-width: 200px; /* Chrome, Safari, Opera */
    -moz-column-width: 200px; /* Firefox */  
    column-width: 200px;
}

Screen Shot 2014-10-20 at 2.43.12 pm

10) columns – A shorthand property for setting column-width and column-count

columns: auto|column-width column-count|initial|inherit;
div {
    -webkit-columns: 200px 4; /* Chrome, Safari, Opera */
    -moz-columns: 200px 4; /* Firefox */
    columns: 200px 4;
}

Screen Shot 2014-10-20 at 3.23.10 pm

OMG!!! 😯 We can do so many things with CSS3 Multi Column properties 😎 … Really, feels awesome with the smoothness of UI with using mutli column CSS :roll:. Hope you will like this post and use the above property in your application (of course if it is required :mrgreen: :-p).

Note :- Please check here for Browser support details.

Thanks 🙂 and will be happy to listen from you 🙂 :).

Version Control with Subversion: Tortoise SVN

The word Version Control represents Revision Control or Source Control, which ultimately specify to control the source code, by managing multiple revisions of the same unit of information.

In simple words, we can say, Version Control System is a software that helps software developers to work together and also maintains complete history of their work by keeping all the work as per version.

Then, what is Subversion … 😕 …

Actually, Subversion is a free or open source version control system (VCS). That is, Subversion manages files and directories and it keeps the record of all the changes made to any file/folder. It keeps all the older revisions as history to examine the code in later time or to check how the data has been changed.

Apache Subversion which is often abbreviated as SVN, is a software versioning and revision control system distributed under an open source license.

Understood something … 🙂 nice 😎 … Let’s check the brief advantages of using it :).

Advantages :-
– Allow developers to work simultaneously.
– Centralized the code.
– Maintain complete history of all developers work.
– Do not overwrite each others changes.
– Enables collaboration between developers.
– Backup and restore the code.
– Short term and long term code revert.

There are a lot more advantages, which you will innovate while using SVN :P.

So, let’s check some terminology of SVN in rough manner.

Repository :-
Repository is a central location in which data is stored and managed. It is the heart/central part of any Version Control System. It keeps all the files, folders, history of data. It can be accessed over a network, as it will be stored in a central position. Repository acts as a server and version control tool acts as client. SVN client can connect to repository over network and can get/set the changes from/to repository, so that the latest changes will be visible to other developer/user by updating the changes.

Trunk :-
It is the main body of development. Generally, it is a directory where all the main development happens and that’s why is usually checked out by developers to work on the project.

Tags :-
Tags are markers to highlight notable revisions in the history of the repository. Usually it will be a point in time on the trunk or a branch that you wish to preserve. We mainly create tags to keep a preservation of a major release. This is the most stable point of the software before major revisions on the trunk were applied.

Branches :-
A branch will be a copy of code or side-line of development derived from a certain point to make larger, experimental, major changes to the code while preserving the untouched code in the trunk. If the major changes, experiment work according to plan, then they can be merged back to the trunk. Other developer can take an update of the working copy and can get the latest code.

SVN Commit :-
Commit means committing/saving the changes into repository. All users need to commit the changes he/she made to the code to make it available for other user.

SVN Update :-
Update means getting the latest data from repository. It brings changes from the repository into your working copy, so that you will get the latest changes made by any user. If we provide any revision number, then it brings the code till that revision, what committed. If no revision is given, it brings your working copy up to date with the HEAD revision.

SVN Log :-
It shows committed log messages from the repository. It will list the details of the committed files with comments, with date and time, when it got committed.

SVN Revert :-
Revert means, to go back to the previous step/stage what already have been accomplished. It reverts any local changes made to a file or directory, property changes made to any folder and it also resolves any conflicted state.

SVN Cleanup :-
It recursively clean up the working copy, removing locks from the working copy and resuming unfinished operations. If for some reason, a Subversion command cannot complete successfully, perhaps due to server problems, then working copy will get locked, then clean up command is necessary to unlock the process.

SVN Switch :-
Generally, switch means, relocating to any other place. Here, SVN switch update working copy to a different URL. If developer is currently on one branch, and done with the changes what has been asked for, then after committing the current branch, developer can now switch to the trunk or any other branch.

SVN Merge :-
SVN merge apply the differences between two sources to a working copy path. It is used to merge the specified files into the trunk so that the latest changes would be overwritten into the trunk, but then need to commit the changes on trunk, to be reflected for other users.

SVN Import :-
The svn import is a quick way to copy an unversioned tree of files into a repository, creating intermediate directories as necessary. SVN import doesn’t require a working copy, and the files are immediately committed to the repository.


Hmmm… We went through some of the terminology which is essential to know while using SVN.

So, please say, should we now use any of the Version Control or not to manage the code :-|.

If we got the points and advantages of using SVN, then :cool:, we are all set and now Ready … Steady … Go …… with Subversion :D.

Thanks 🙂 and will be happy to listen from you 🙂 :).

HTML5: A multi-threading approach with Web Workers

The word Web Worker specifies a JavaScript running in the background, without affecting the performance of the page, independently of other user-interface scripts that may also have been executed from the same HTML page.

Let’s go into little depth to understand what it exactly means :).

Javascript will hang the browser, where the code written by us requires a high CPU utilization. When executing scripts in a Web page, the page becomes unresponsive until the script is finished and shows “unresponsive script” alert message.

ummm … 😡 we should check one example, to better understand, what I want to say here!!!

<!DOCTYPE HTML>
<html>
    <head>
        <title>Big loop test</title>
        <script>
            function loopTest() {
                for (var i = 0; i <= 10000000000; i++){
                    var j = i;
                }

                alert("Completed " + j + "iterations" );
            }

            function sayTime() {
                var d = new Date();
                var hour = d.getHours();
                var minute = d.getMinutes();
                var second = d.getSeconds();

                alert(hour + ':' + minute + ':' + second);
            }
        </script>
    </head>
    <body>
       <input type="button" onclick="loopTest();" value="Check For Loop" />
       <input type="button" onclick="sayTime();" value="Get Current Time" />
    </body>
</html>

If we run the above code, and click both the button one by one, we will get the following error alert message, as because CPU will be busy running the loop and wait for the completion of that task.

Screen Shot 2014-10-09 at 11.54.21 am

So, what should we do now ❓ … Do we really have any idea, how to fix this type of issue :-(.

Hmmm… 💡 Yes, I guess we can do so using Web Workers 🙂 😎

Web Workers allow for concurrent execution of the browser threads, which will do all the computational tasks without interrupting the user interface and run on separate/different threads. That means, we can continue to do whatever we want: clicking, selecting things, loading images etc., while the web worker runs in the background.

Sounds interesting 😎 🙂

Process :-
Web workers interact with the main document via message passing. The following code illustrates about how Web Worker works.

<!DOCTYPE HTML>
<html>
    <head>
        <title>Big for loop</title>
        <script>
            var worker = new Worker('checkLoop.js');

            if(typeof(Worker) !== "undefined") {
                worker.onmessage = function (event) {
                    alert("Completed " + event.data + "iterations" );
                };

                function sayTime() {
                    var d = new Date();
                    var hour = d.getHours();
                    var minute = d.getMinutes();
                    var second = d.getSeconds();

                    alert(hour + ':' + minute + ':' + second);
                }
            } else {
                alert('Your browser does not support Web Worker');
            } 

            
        </script>
    </head>
    <body>
       <input type="button" onclick="sayTime();" value="Get Current Time"/>
    </body>
</html>

checkLoop.js

for (var i = 0; i <= 1000000000; i++){
   var j = i;
}
postMessage(j);

if(typeof(Worker) !== "undefined") { ... }

This code checks for the Browser support of Web Worker.

var worker = new Worker('checkLoop.js');

This code is used for initializing Web Worker with the URL of a JavaScript file, which contains the code the worker will execute. If the specified javascript file exists, the browser will spawn a new worker thread, which is downloaded asynchronously. If the path does not found, the worker will fail silently.

worker.onmessage = function (event) { ... }

This code sets event listeners and communicates with the script that spawned it from the main page.

Terminate a Web Worker :-

worker.terminate();

When a web worker object is created, it will continue to listen for messages (even after the external script is finished) until it is terminated. So, need to use the above code to terminate a Web Worker.

Reuse the Web Worker :-

worker = undefined;

If you set the worker variable to undefined, after it has been terminated, you can reuse the code.

Note :- Since web workers are in external files, they do not have access to the following JavaScript objects.

  • Parent Object
  • Window Object
  • Document Object

Note :- Please check here for Browser support details.

Thanks 🙂 and will be happy to listen from you 🙂 :).

Install Zend Framework 2 on Windows OS !!!

As many of us know about ZF2 (Zend Framework 2), it is an open source, object oriented Framework designed for developing web applications and services using PHP 5.3+.

So, in this post we will go through the installation process for ZF2 Framework with a skeleton application so that it will be easier for the developer to continue developing the application directly :).

We will go through just simple 4 steps and then we will be done with the installation.

Step 1 :-
We can install ZF2 skeleton application in 2 different ways.

Case 1 :-

Go to here and click the zip button to download. Unzip this file into the directory where you keep all your vhosts (in this case, I used D:/projects/) and rename the folder to ZendSkeletonApplication.

Case 2:

Install GIT Bash if you have not installed yet. Installing GIT is easy to do. Go to http://git-scm.com ➡ Downloads ➡ Select OS ➡ Save File ➡ Run ➡ Accept all and install it.

Open GIT bash and open the folder where you keep all your vhosts or where you want to create the Project (in this case, I used D:/projects/) and run this command –

git clone git://github.com/zendframework/ZendSkeletonApplication.git

After this, one folder will be created on your specified path named as ZendSkeletonApplication.

Step 2 :-
Open GIT Bash and go to ZendSkeletonApplication folder using

cd D:/projects/ZendSkeletonApplication

Then run the following command

E:/xampp/php/php.exe composer.phar self-update

Then after executing the above command, run the below command

E:/xampp/php/php.exe composer.phar install

Note: Here in my case, I have my xampp folder inside E:/ drive.

Step 3 :-
Add the following in httpd-vhosts.conf (E:\xampp\apache\conf\extra\httpd-vhosts.conf) file. After adding the below lines, restart your xampp.

<VirtualHost *:80>
    ServerName http://zend.localhost.com
    ServerAlias zend.localhost.com
    DocumentRoot "D:\projects\ZendSkeletonApplication\public"
    SetEnv APPLICATION_ENV "development"
    <Directory "D:\projects\ZendSkeletonApplication\public">
        DirectoryIndex index.php
        AllowOverride All
        Order allow,deny
        Allow from all
    </Directory>
</VirtualHost>

Step 4 :-
Finally, add the following in your host file (C:\Windows\System32\drivers\etc\host).

zend.localhost.com

😎 great !!! Now, everything is set and ready to use. Browse http://zend.localhost.com and you will get the default skeleton application page :eek:.

Screen Shot 2014-10-06 at 6.47.59 pm

If you are finding the page like above, while browsing http://zend.localhost.com, then 😎 :D, we are done now (clap).

Thanks 🙂 and will be happy to listen from you 🙂 :).

HTML5: Use of MathML – A better way to present mathematical notation

The word MathML represents Mathematical Markup Language, which means a language which designed to present and capture mathematics for Web.

In computer language,

MathML is an XML application for describing Mathematical notation and capturing both the structure and content. The goal of MathML is to enable Mathematics to be served, received and processed in WWW.

MathML elements can be used inside HTML5 document using <math>...</math> tags.

Ummm… 😐 difficult to understand the theory… me too :(.

So, let’s check one example for our clarification :-

Example – 1

<html xmlns="http://www.w3.org/1999/xhtml" lang="en" xml:lang="en">
    <head>
        <title>Binomial Theorem</title>
    </head>
    <body>
        <p>Binomial Theorem:</p>
        <math xmlns="http://www.w3.org/1998/Math/MathML">
            <mrow>
                <msup>
                    <mfenced>
                        <mrow>
                            <mi>a</mi>
                            <mo>+</mo>
                            <mi>b</mi>
                        </mrow>
                    </mfenced>
                    <mn>2</mn>
                </msup>
                <mo>=</mo>
                <msup>
                    <mrow>
                        <mi>a</mi>
                    </mrow>
                    <mn>2</mn>
                </msup>
                <mo>+</mo>
                <msup>
                    <mrow>
                        <mi>b</mi>
                    </mrow>
                    <mn>2</mn>
                </msup>
                <mo>+</mo>
                <mrow>
                    <mn>2</mn>
                    <mi>a</mi>
                    <mi>b</mi>
                </mrow>
            </mrow> 
        </math>
    </body>
</html>

This would produce the following output :-
Screen Shot 2014-10-03 at 6.04.35 pm

Wonderful 😯 … This is really nice :eek:. Using the above markup language, we can create any mathematical notation. 🙂 Great !!!

The above code contains some tags, which might be unknown for some of us. So, let’s analyze those and put some light on those tags for better understanding.

  1. <mrow> : horizontal row of items
  2. <msup>, <munderover> : superscripts, limits over and under operators like sums, etc.
  3. <mfrac> : mathematical fractions
  4. <msqrt> and <mroot> : roots
  5. <mfenced> : surrounding content with fences, such as parentheses.
  6. <mi>x<mi> : mathematical identifiers
  7. <mo>+</mo> : mathematical operators
  8. <mn>2</mn> : mathematical numbers
  9. <mtext>non zero</mtext> : mathematical text

😎 Let’s check some more example and that should be little critical ones ;-).

Example – 2

<html xmlns="http://www.w3.org/1999/xhtml" lang="en" xml:lang="en">
    <head>
        <title>Quadratic Formula</title>
    </head>

    <body>
        <p>Quadratic Formula:</p>
        <math xmlns="http://www.w3.org/1998/Math/MathML">
            <mrow>
                <mi>x</mi>
                <mo>=</mo>
                <mfrac>
                    <mrow>
                        <mo form="prefix">-</mo>
                        <mi>b</mi>
                        <mo>±<!-- &amp;PlusMinus; --></mo>
                        <msqrt>
                            <msup>
                                <mi>b</mi>
                                <mn>2</mn>
                            </msup>
                            <mo>-</mo>
                            <mn>4</mn>
                            <mi>a</mi>
                            <mi>c</mi>
                        </msqrt>
                    </mrow>
                    <mrow>
                        <mn>2</mn>
                        <mi>a</mi>
                    </mrow>
                </mfrac>
            </mrow>
        </math>
    </body>
</html>

This would produce the following output :-
Screen Shot 2014-10-03 at 7.22.44 pm

Example – 3

<html xmlns="http://www.w3.org/1999/xhtml" lang="en" xml:lang="en">
    <head>
        <title>Matrix Example</title>
        
        <style>
            body {
                margin-left: 10%;
                margin-top: 5%;
            }
        </style>
    </head>

    <body>
        <p>Matrix Example:</p>

        <math xmlns="http://www.w3.org/1998/Math/MathML">
            <mrow>
                <mfenced open="(" close=")">
                    <mtable>
                        <mtr>
                           <mtd><mi>1</mi></mtd>
                           <mtd><mi>5</mi></mtd>
                           <mtd><mi>3</mi></mtd>
                        </mtr>
                        <mtr>
                           <mtd><mi>8</mi></mtd>
                           <mtd><mi>2</mi></mtd>
                           <mtd><mi>6</mi></mtd>
                        </mtr>
                        <mtr>
                           <mtd><mi>7</mi></mtd>
                           <mtd><mi>9</mi></mtd>
                           <mtd><mi>0</mi></mtd>
                        </mtr>
                    </mtable>
                </mfenced>
            </mrow>
        </math>
    </body>
</html>

This would produce the following output :-
Screen Shot 2014-10-03 at 7.55.46 pm

Great !!! 🙂 😎 Very interesting one :). We can do any mathematical notation with MathML.

Note: Please check here for Browser support details.

Thanks 🙂 and will be happy to listen from you 🙂 :).

Why to use Framework in PHP!!

Introduction:-
The word FRAMEWORK is the combination of two words i.e. FRAME and WORK. It means, one FRAME has already been designed and developer has to WORK on that FRAME to meet his/her project requirements. It’s just a tool, which helps developer to code better and faster.

In computer language, a Framework is an universal, reusable software platform to develop software applications, products and solutions. In other words, we can say it is some kind of library, a piece of software, which provide web developers with code base and consistent standardized ways of creating web applications.

Back when PHP and other technology started, developers were writing their own custom code for each functionality. After then, some people realized that, writing the same code every time, in every page, not reusing it extensively, plain PHP is not so effective.

Afterwards, as the PHP object model developed (especially with the launch of PHP 5), framework development really came into action and became so popular.

So, lets not stretch this topic as chew gum 😀 and let’s check what are the key benefits of using a Framework, especially in PHP.

Organizing Code and File :-
When you setup a PHP Framework, it already has a certain folder structure. Most of the Framework, use MVC (Model-View-Controller) guideline or structure for managing the code. MVC pattern allows to separate business logics and presentation layer of your website, making its structure consistent and maintainable. It is expected from you to follow the same standards and keep everything organized in a certain way. Once you get used to this model, you will never want to go back.

The MVC Pattern :-
The Popular PHP frameworks like CakePHP, CodeIgniter, Zend Framework , Symfony follows Model View Controller(MVC) design pattern which separates business logic from user interface making the code cleaner and extensible. The way the MVC Pattern applies to PHP applications:

  • Models represent your data structures, usually by interfacing with the database.
  • Views contain page templates and output.
  • Controllers handle page requests and bind everything together.

Enforcing of Good Coding Standards :-
Another effect of using Framework is maintaining coding standard in an efficient manner. Coding conventions are a set of guidelines for a specific programming language that recommend programming style, practices and methods for each aspect of a piece program written in this language. Using Framework makes it so much easier to code as you should.

Utilities and Libraries :-
PHP is a great language for web development and provides countless number of tools and libraries. As everybody can guess, these frameworks contains a lot of libraries to make your job easier. All top PHP frameworks come with certain Libraries and Helpers, that help you with:

  • Form Validation
  • SOAP/REST API
  • Caching Mechanism
  • Input/Output Filtering
  • Data Handle With JSON
  • Database Abstraction
  • Session and Cookie Handling
  • Email, Calendar, Pagination etc…

Less Code & Faster Development :-
These MVC framework will really helps you to develop the project rapidly, if you know one framework well then you’ll never worry about the project deadline. You will write less code, which means less time spent typing. You will not have to chase down 3rd party libraries all the time for every new project because most of them will come with the default framework install. While working on a large project in a team, these MVC PHP framework will be a great tool for development as you can assign a developer to develop MVC part of a module for a developer and integration will be quite easy of these developed module at final level. Also, since you are being more organized, it will be much faster to chase down bugs, maintain code, and make changes to existing code.

Community Support :-
All popular PHP Frameworks have great active communities behind them. There is no lack of support from the community, the documentation, and the developers. If you have any questions or need any clarifications, a quick search with the right keywords should almost always give you relevant results. If not, there’s still the message boards, mailing Lists, the official and unofficial forums or the unofficial IRC channel.

Security :-
With a framework, most of the work for code security can be done for you automatically. For example:

  • Central Authentication
  • Any value passed to database object gets filtered against SQL injection attacks
  • Central input validation and filtering
  • All html generating functions, such as form helpers and url helpers filter the output automatically
  • Cross Site Request Forgery (CSRF) Protection
  • Session Management Security
  • Cross Site Scripting (XSS) Protection
  • Encrypting cookies automatically is only a matter of changing a config option and lot more…

Performance Tools :-
Framework tools are utility module for maintaining modular application. You can actually gain perCode generation make developers life easier by creating files and default content automatically so you don’t have to do the same thing again. Framework come with tools that help you to do caching, benchmarks, profiling etc… Modern frameworks are also great with dynamic loading, as they load code only as needed. Lazy loading concept is also there, to make the web page ready, till the time content is ready. Different page requests can load different amount of library code based on what needs to be used.

Simplified and Pretty URLs :-
Most Framework use a bit of mod_rewrite magic to ensure, your URLS are always clean and accessible. Apache handles requests to a particular URL, and (hidden to the client) returns this URL to /index.php as a GET string. The index page instantiates your main framework object. Accessible URLS also help with SEO. URLs are great for below reasons:

  • They look prettier
  • They are easier to remember
  • They help you save filespace on pages which have many links
  • They are easier to link to, both for you and for other webbies
  • They help cut down on typos because there is less confusion about what exactly to write and type

Efficiently Access Database :-
Framework provides the way to access database in an object-oriented way. Instead of directly interacting with the database using SQL queries, you can use any Object-Relational Mapping (ORM) model to manage the structure and relationships between your data. With ORM model, you can map your database table to a PHP class and a row from that table is mapped to an instance of that class.

Conclusion :-
You might not opt for using PHP Framework or using a Framework may or may not be the best choice for you. But, if we are believing with the word “Performance Really Matters”, then we can try for any popular PHP Framework, and that will be even easier and robust way to develop applications. Frameworks are cool and easy, and we can’t tell what tomorrow is going to bring. I hope this blog will help you to understand what are the advantages of using a Framework and will value Developers.

After reading the above post, are we still thinking, whether to use Framework or not !!! 😐 😮 😦

But, if we got the points and benefits of Framework, then 😎 ;-), we are way to go :). Hope you will like this post and will use Framework, if not till now :mrgreen:.

Thanks 🙂 and will be happy to listen from you 🙂 :).

HTML5: Use of picture element for responsive image design

The word Responsive, itself suggest a technique for providing flexible UI for different view-ports. The Responsive Design allows designers or developers to build website that adapt to every screen size, in result, it should responds to the needs of the users and the devices they are using. Adapting Responsive Web Design, developers or designers will get a strategic solution for performance issue, starts from excessive downloads of images, JavaScript and CSS and HTML. The main advantage is – the layout changes based on the size and capabilities of the device.

For example – on a phablet, users would see the content with a single column view, on a tablet, it might show the same content in two columns and on a lappy, the same might show in more than two columns.

But, let me think, why I am discussing the above stuff… 😐

Probably, I should give an example, what exactly I am going to represent here.

output

The above image specifies, one image in three different view-port. Here, the same image has been represented in 3 different sizes.

To get the above output – the developer/designer might have to write the following code –

<!DOCTYPE html>
<html>
    <head>
        <style>
            /* For wider screen */
            body {
                background: url('images/abc.jpg') no-repeat;
                background-size: 1400px auto;
            }
 
            /* For ipad */
            @media only screen and (min-width: 480px) and (max-width: 768px) {
                body {
                    background: url('images/abc.jpg') no-repeat;
                    background-size: 700px auto;
                }
            }
 
            /* For iphone */
            @media only screen and (max-width: 479px) {
                body {
                    background: url('images/abc.jpg') no-repeat;
                    background-size: 300px auto;
                }
            }
        </style>
    </head>
 
    <body></body>
</html>

OR

If we don’t want to load the same high resolution images in all the scenarios, then we can check with the below code –

<!DOCTYPE html>
<html>
    <head>
        <style>
            /* For wider screen */
            body {
                background: url('images/abc-high-res.jpg') no-repeat;
                background-size: 1400px auto;
            }
 
            /* For ipad */
            @media only screen and (min-width: 480px) and (max-width: 768px) {
                body {
                    background: url('images/abc-med-res.jpg') no-repeat;
                    background-size: 100% auto;
                }
            }
 
            /* For iphone */
            @media only screen and (max-width: 479px) {
                body {
                    background: url('images/abc-low-res.jpg') no-repeat;
                    background-size: 100% auto;
                }
            }
        </style>
    </head>
 
    <body></body>
</html>

We can customize more with the above code for best view in all the scenarios.

But, what is the use of picture element here ❓ 😕
.
.
.
.
No worries 😛 – lets put some light on the picture element now, the reason why we are reading this blog 😀

The output what we got from the above code, can be done easily, using picture element.

<!DOCTYPE html>
<html>
    <body>
        <picture>
            <source media="(max-width: 479px)" src="images/abc-low-res.jpg">
            <source media="(max-width: 768px)" src="images/abc-med-res.jpg">
            <source src="images/abc-high-res.jpg">
            <img src="images/abc-high-res.jpg" alt="This picture loads on non-supporting browsers.">
            <p>Accessible text.</p>
        </picture>
    </body>
</html>

That’s it :-). Isn’t it really interesting, that with the 4 lines of code only, we can achieve the above thing easily :-). Hmmm… sounds really interesting 🙂 :).

Note: Please check here for Browser support details.

Thanks 🙂 and will be happy to listen from you 🙂 :).

CSS: Custom HTML5 form validation with visual effects using Pseudo Class

As we know, Pseudo Code is an informal descriptive language which helps human being to understand the code, rather than just only machine readable. CSS pseudo-classes are used to make the UI more interactive and user-friendly, that means to add special effects to some CSS selectors.

The syntax of pseudo-classes:

selector:pseudo-class {
    property:value;
}

Let’s check an example how :valid and :invalid pseudo-classes works.

<!DOCTYPE html>
<html lang="en">
    <head>
        <meta charset="utf-8">
        <style type="text/css"> 
	    input:required:invalid, input:focus:invalid { 
		background: url(https://pravasini.files.wordpress.com/2014/09/invalid1.png) no-repeat right top;
	    } 
		
	    input:required:valid { 
		background: url(https://pravasini.files.wordpress.com/2014/09/valid.png) no-repeat right top; 
	    } 
	</style>
    </head>
    <body>
	<form action="" method="post">
	    <label for="email">Email: </label>
	    <input type="email" required>
	    <button type="submit">Go </button>
	</form>
    </body>
</html>

The above code will output as :
invalid

OMG!! 😯 without adding a single line of javascript code, how we are able to show customize error icon :-|.

WOW!! Great 🙂 … That’s really cool 8-). As we added CSS for focus invalid input, that’s why it is showing the invalid input icon.

Check the below output on valid url input:
invalid

There are a lot more Pseudo Class are available through which we can really add special effects without using javascript. Below listed Pseudo Classes are some of the examples among those –

  1. :first-child
  2. :focus
  3. :hover
  4. :right
  5. :target
  6. :valid
  7. :visited
  8. :active
  9. :checked
  10. :default
  11. :dir()
  12. :disabled
  13. :empty
  1. :enabled
  2. :first
  3. :root
  4. :scope
  5. :last-child
  6. :last-of-type
  7. :left
  8. :link
  9. :not()
  10. :nth-child()
  11. :only-child
  12. :first-of-type
  13. :fullscreen
  1. :only-of-type
  2. :optional
  3. :out-of-range
  4. :read-only
  5. :read-write
  6. :required
  7. :indeterminate
  8. :in-range
  9. :invalid
  10. :lang()
  11. :nth-last-child()
  12. :nth-last-of-type()
  13. :nth-of-type()

Note: Please check here for Browser Support details.

Thanks 🙂 and will be happy to listen from you 🙂 :).

HTML5: Regular Expression

Tech Tricks

The biggest advantage to field validation is the addition of pattern attribute to most of the form fields where validation applies. The pattern attribute specifies a regular expression that the element’s value is checked against. This attribute responsible for checking or matching the pattern, specified for the input field and considered to be invalid if user enters the wrong pattern. Upon invalid input, it will display an error message as a tooltip or in the statusbar.

So, let’s go through an example of showing how it works.

The above example validate the username for minimum 5 characters and maximum 20 characters and will accept only alpha-bates (both upper and lower case).

Check the below output on invalid input. It will pop-up the error message as “Please match the requested format.”

error_message

But, how can we customize the error message?? ❓ 😐

💡 😎 It’s too simple though :). We can…

View original post 138 more words